Whether you are using loaner equipment or have your own kit, taking care of the gear you use is your responsibility. Fencing equipment is designed to endure the hardships of combat, but we can extend its overall life span by doing little things to care for and maintain the equipment we use. Additionally, everyone should understand what required gear you need to fight with us in the Order of the Rose. In this lesson, we’ll go over the common pieces of gear, how to care for them, and why it’s required.
Your Rapier
We use rapiers as our primary weapon. It’s a classic renaissance style sword that you might have seen in The Princess Bride or Three Musketeers. It’s an elegant weapon designed for stabs and thrusts instead of large cuts and hacks. All of our swords were made for combat, and not just any sword can be used.
Note: the rapier used in the images below is an example of a very open guard. Rapiers can come in all sorts of complex and ornate designs and you will need to compare each part to the sword you hold in your hand.
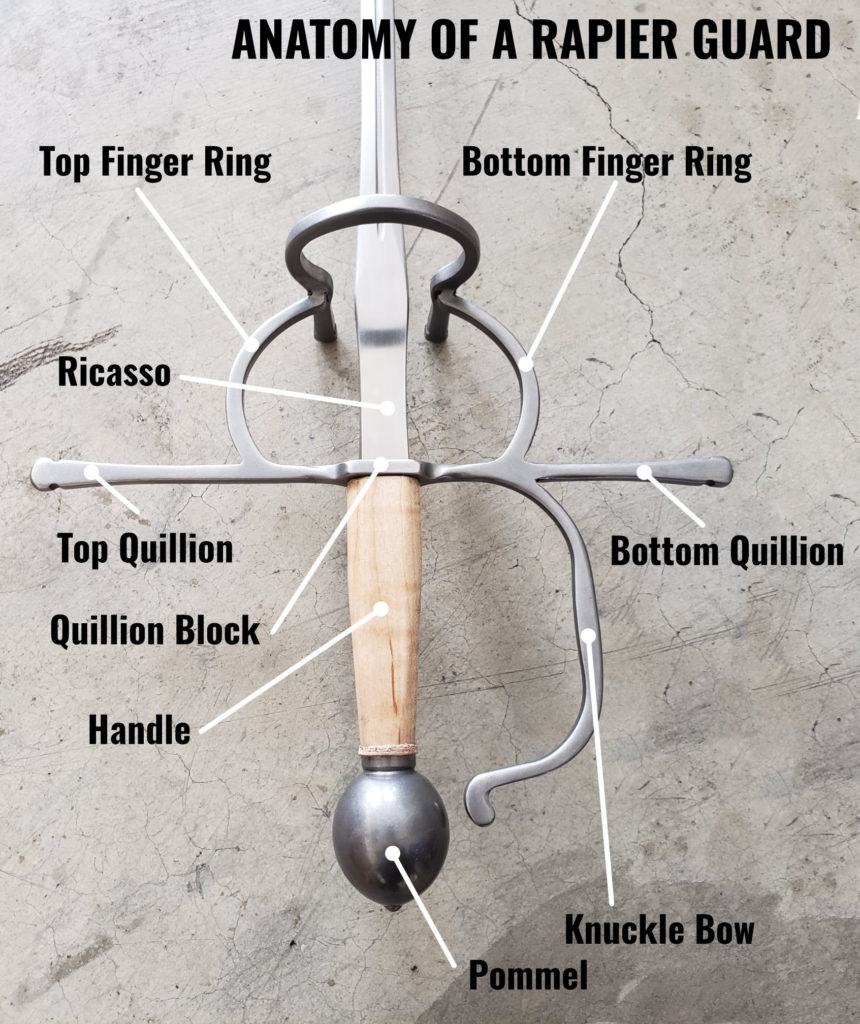
- Anatomy of a Rapier Guard: Each rapier guard is different and there are many different styles, but you’ll be able to find many of the same parts no matter what sword you pick up.
- Top Finger Ring: A supporting bar to protect your hand and allow for various grips.
- Bottom Finger Ring: Most standard grips will wrap your first finger around this ring for better support and control.
- Ricasso: An “unsharpened” section of the blade, usually within the guard.
- Top Quillion: The upper rod that extends perpendicular to the blad and is used for protecting the hand, binding blades, and deflecting the sword of the opponent.
- Bottom Quillion: The lower rod that extends perpendicular to the blad and is used for protecting the hand, binding blades, and deflecting the sword of the opponent.
- Quillion Block: A thicker part of the guard where the tang slides through to connect with the handle.
- Handle: Usually a wooden grip that envelopes the tang of the blade.
- Knucklebow: A bar metal that extend down in front of the sword hand, protecting the knuckles. The knucklbow can be used to identify the true edge of the sword.
- Pommel: A counter weight at the base of the blade. It typically screws onto the threaded portion of the blade’s tang.
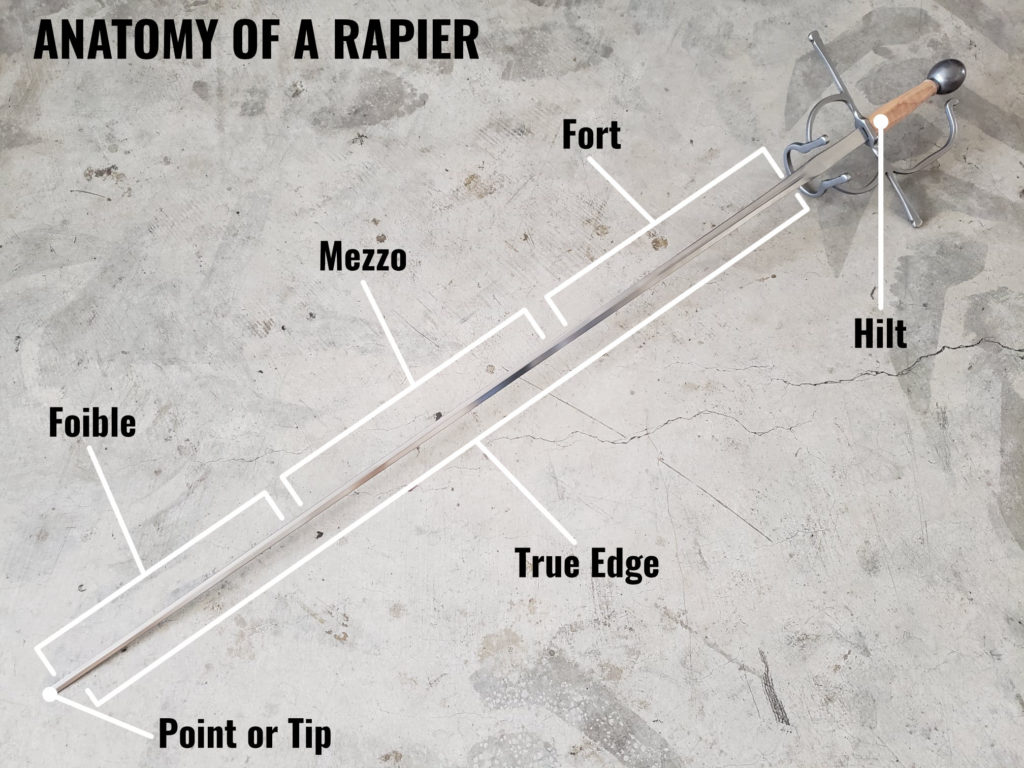
- Anatomy of a Rapier: Apart from the guard, the main difference you’ll find is in the blade itself. Most blades are between 34″ and 44″ with the average being about 38″.
- Hilt: The entire guard as a whole can be referred to as the Hilt.
- Fort: The lower third of the blade. This is considered the strongest part of the blade and used for blocking.
- Mezzo: The middle third of the blade.
- Foible: The upper third of the blade. It is considered the weakest due to the bend and distance from the hilt.
- Point or Tip: The killing point of the blade used for stabbing and strikes. All rapiers will have a rubber blunt taped to the end.
- True Edge: The lower edge of the blade, on the same side as the knucklebow. It is the best side for blocking.
- Caring for Your Rapier: A rapier is more than just a metal stick and should be treated with respect, even if it’s just a loaner blade. Consider the following as you wield your blade on and off the field.
- Wield it with control and precision. Wild hacks, beating on your opponent’s blade, or banging it on the ground weakens the blade.
- Try not to drop the sword. Resist the urge to just toss the sword down when you come off the field.
- If your blade gets wet, take a moment to dry it off.
- Check occasionally for burs or loose tips. Run your finger on the edge and tug on the blunt firmly.
- Periodically, clean your sword with oil, magic eraser, or steel wool to clean off any rust.
Your Mask
We use a standard fencing mask, or 3-Weapons mask, in our fighting. It’s the same kind of mask you might see in the Olympics, except they are not electric. They’re built to resist any solid strikes and protect your face without reducing your visibility too much.
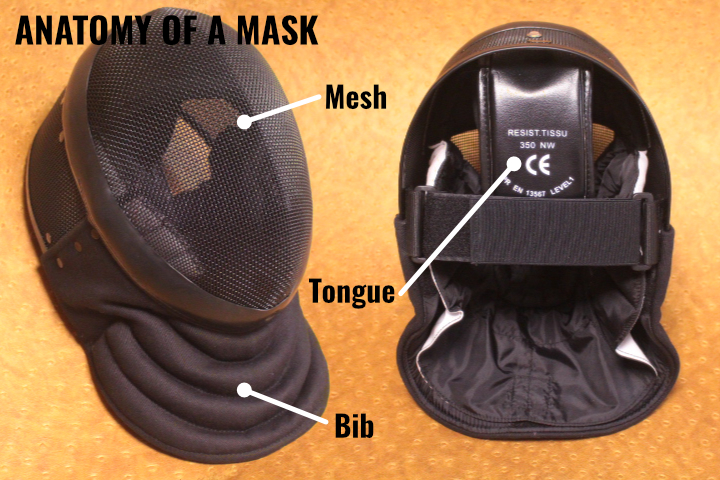
- Anatomy of a Mask: Your mask is a pretty straight forward piece of your kit and is designed to keep your head safe. It may feel odd at first, but eventually you’ll feel right at home in your mask.
- Mesh: A tightly woven mesh of steel. Over time you forget that you’re looking through it.
- Bib: A thick padded collar that extends over your neck.
- Tongue: A rigid flap that can be bent to apply gentle pressure to the back of your head.
- Caring for Your Mask: Masks are often on the first pieces of kit fencers get and it’s also the one closest to your nose, so it pays to take care of your mask with just a few simple things.
- When not in use, let it air out. Stuffing it in your bag all week is a great way to make it stink.
- After practice, consider wiping the inner lining with a wet wipe or damp cloth to remove some of the sweat. This helps reduce the small and keeps the padding from going stiff.
- Try to wash it every now and then. Washing a mask can be tricky but it can be done. If you need help, try searching on YouTube or asking another fencer.
Your Gorget
Pronounced “gor·jè” (it’s French), your gorget is a neck collar of stainless steel and probably the most important piece of equipment you can wear. They come in different sizes and can be adjusted.
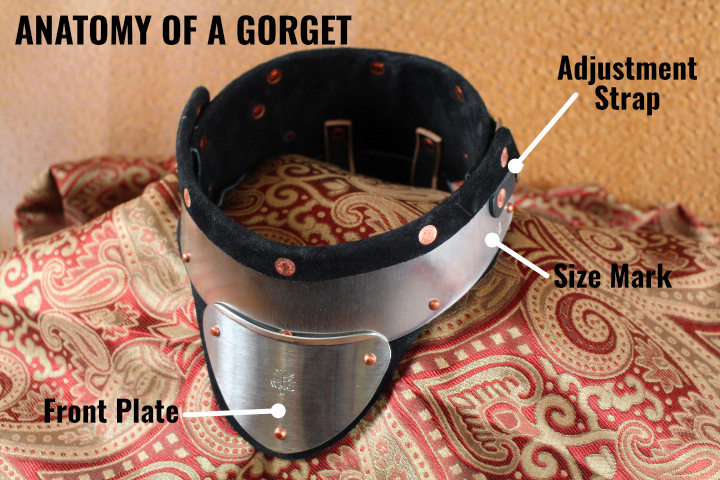
- Anatomy of a Gorget: It’s a band of steel, lined with leather. It’s not very complicated, but it helps to get the right size. You can tell by whether or not it fits comfortable and if you can’t fit more than two fingers between the gorget and your neck.
- Front Plate: The triangular plate indicates the front of the gorget and extends down below your collar.
- Adjustment Strap: There are two straps on either side can can tighten or expand the gorget. You may need to overall the steel plates to get it to fit properly. We recommend only adjusting one strap at a time.
- Size Mark: Most gorgets have a size mark to indicate the size, but most of the time its more about feel. You’ll want to find a gorget that works for you and try to stick with that one.
- Caring for Your Gorget: Like most fencing equipment, gorgets are pretty durable and only need mild care to last.
- After fighting, wipe it down. Use a wet wipe or cloth to clean the leather lining and then dry it off. Follow basic leather care to keep the leather supple.
- Brush off the rivets. The rivets will eventually discolor and can be cleaned with an old toothbrush or hard scrub.
- Try not to store it all bent up. You’ll often throw your gorget into your bag, but try to store it as if it was being worn. This is gentler on the straps and can increase their life span.
Other Required Gear
Your base kit is your sword, mask, and gorget. From there the only other required pieces are your gloves and proper base clothing. Every piece of equipment is designed to keep you and everyone else safe. Everything except gloves is available as loaner gear.
- Proper Base Clothing: You should come to practice dressed to fence. Base clothing involves long pants, closed toed shoes, and long sleeved shirts. We additionally also throw on a vest of thicker or padded material to help reduce impact from strikes and help protect against any punctures.
- Note: if you choose to wear short sleeves or shorts, you accept the consequences of having exposed limbs. They will get battered.
- Fencing Gloves: Your hands do take a beating while fencing and so it pays to wear gloves. Leather gloves with a long cuff are really nice and look awesome, but most work gloves would work too. Try to find some with a little padding but still allow a good amount of dexterity in your fingers.
- Caring for Your Gear: Essentially it comes to down keep it clean and let it air out when not in use. All of your gear will benefit from treating it nicely and taking the time to maintain it.