I have been getting a lot of requests of late to make patterns for our fencers to use for their deadly desires. It’s really exciting to see people add to their gear and to see cloaks beginning to be more popular. It is a tricky thing to use and very few people in the group enjoy fighting with it.
I’ve decided to try my hand at making digital instructions to help you make your cloaks so you can make them anytime you want (like in the off-season). If you have any questions, please contact me or any of the Broderers. We would love to help you!
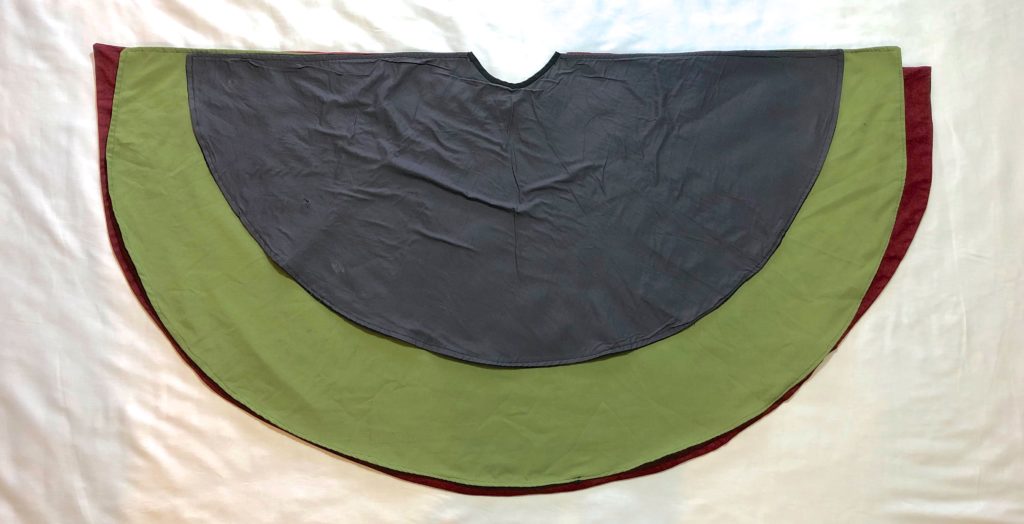
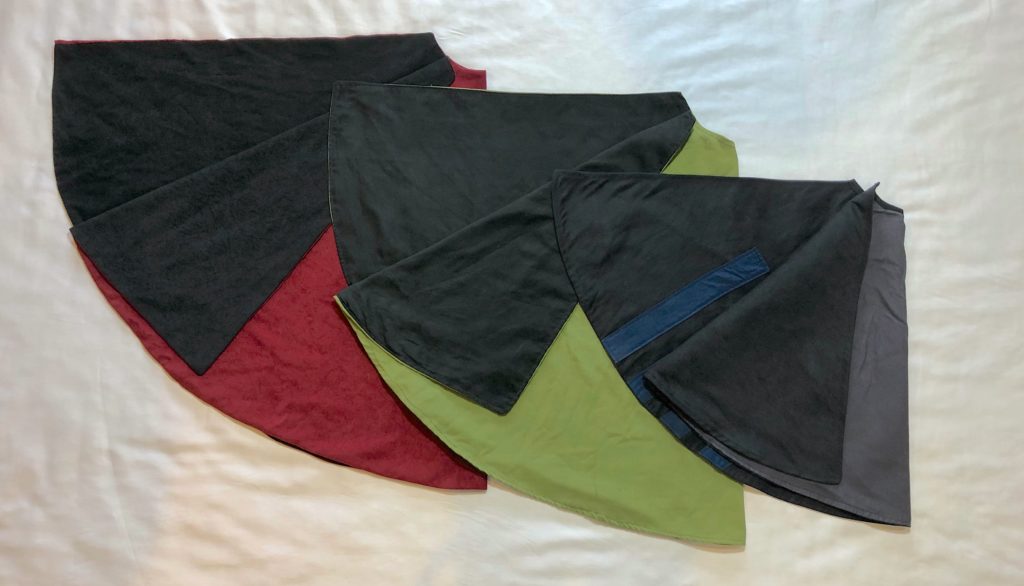
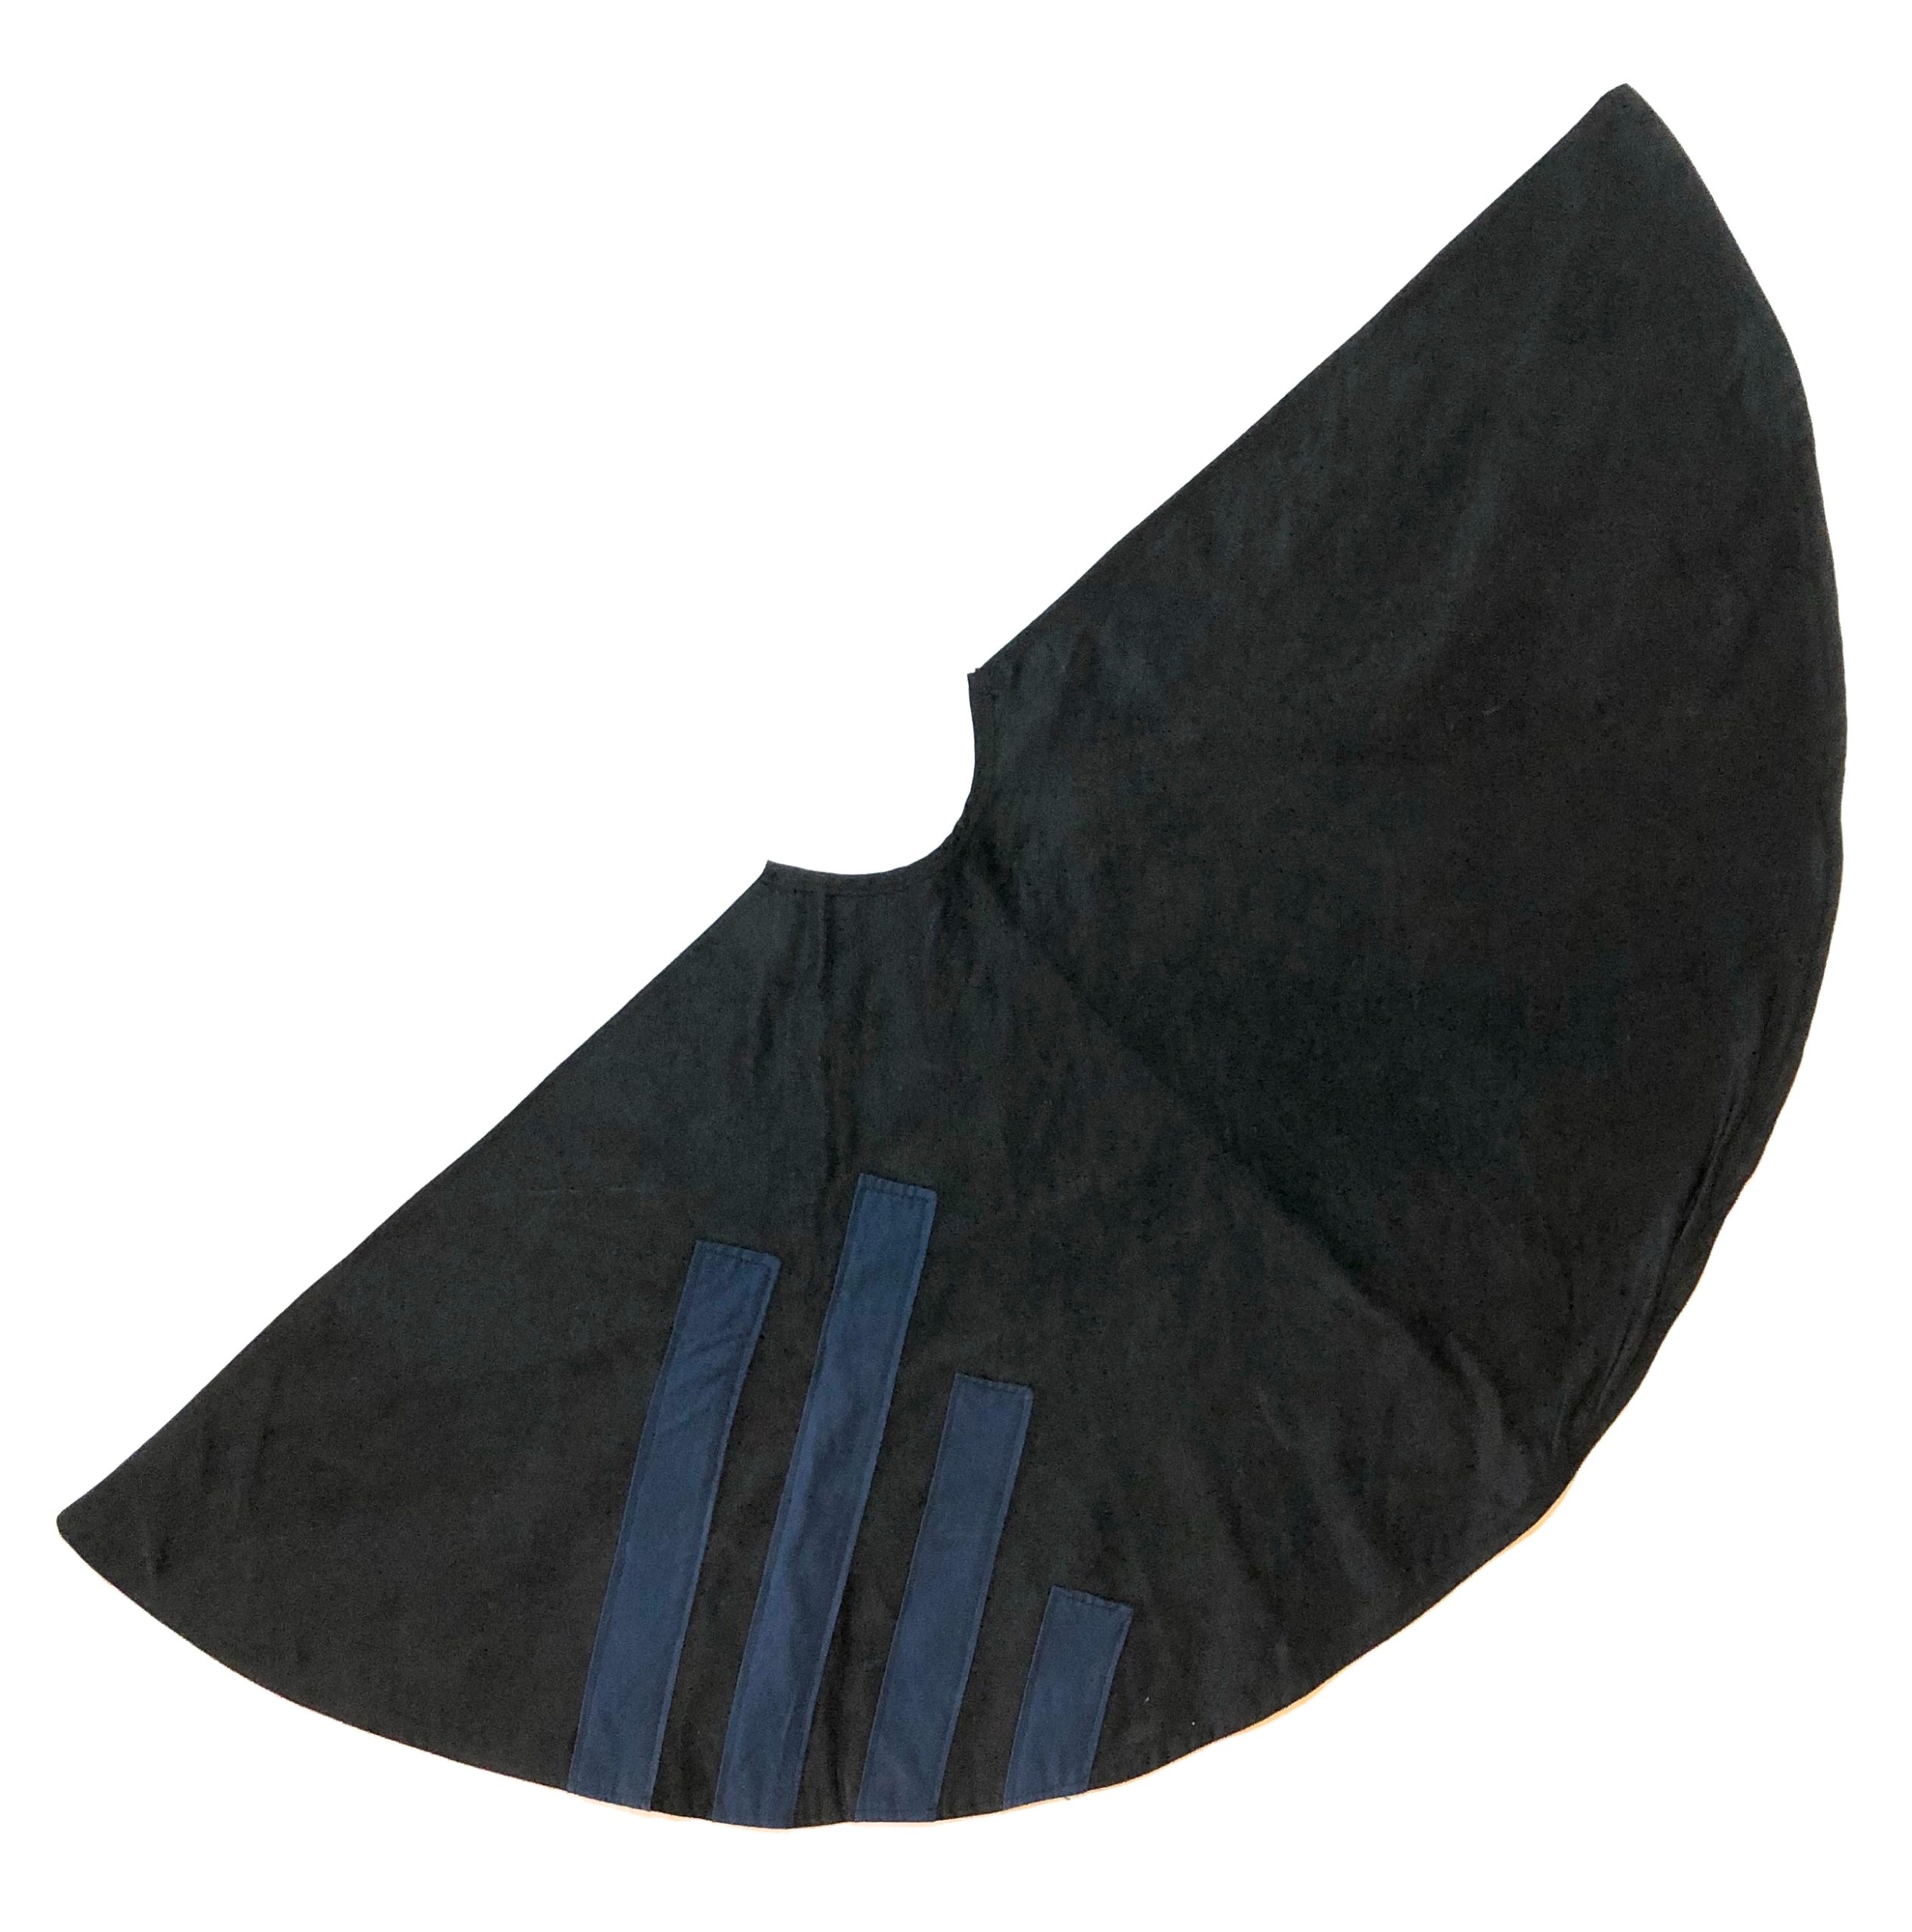
Most people seem to like Edward’s cloak for its size and weight. All credit for his cloak goes to Miren Folley. I have pictures of three cloaks above. The one with the blue stripes and gray lining is Edwards, the green one is Shay’s, and the red one is from the loaner gear.
The dimensions for these cloaks are (diameter x radius):
- Edward: 48 x 24in
- Shay: 56 x 28in
- Loaner: 60 x 30in
Before starting your cloak, here are some things to consider:
- How big you want your cloak to be
- Type of fabric you want it to be made out of
- What design you want on it (if you want one)
- The finish of the hand area
HOW BIG SHOULD I MAKE IT?
Those that are tall can probably handle bigger cloaks because of their long arms. Shorter people would be best to use a smaller cloak. You don’t want the length to be more than you can handle for your height. It would be harder to twirl, heavier, obscure more of your vision, and get caught on your own sword. But the longer it is, the better chance you’ll have of catching your opponent’s blade and gaining control with the heavier weight. If you want to do something long, I would not go past 30 inches for the radius.
- Measure from your belly button to the bottom of your knee. That is your finished radius measurement.
- When making the pattern, add 1/2 inch onto your finish measurement for your seam allowance. If you don’t, your cloak will be a 1/2 inch shorter than what you just measured.
For Edward, his cloak goes from his belly button to the top of his knee. It is on the shorter side for him, but he likes it like that. When Edward held up Shay’s cloak, from his belly button to his knee, it went to his mid-shin – definitely on the bigger side for him.
WHAT TYPE OF FABRIC SHOULD I BUY?
You should get something that has a bit of weight to it, is durable, a bit rigid, and yet has some flexibility. The weight and rigidness will help with control and with twirling it. It is also being stabbed or likely to get caught on branches or thorns, so it needs to be durable. And if you wrap it around your arm, it will need some flexibility for it to stay on your arm and not unwrap.
Edward’s is made out of black suede, gray linen for the back, and blue cotton for the stripes. Shay’s is black moleskin (faux velvet) with green linen. The loaner is moleskin on both sides.

Edward’s has the best weight out of all of them, and the loaner is the most light. We had a hard time trying to twirl the loaner one because it was so light. Shay’s linen helped give it some weight but is also on the light side. So consider the weight when you are buying your fabric. You could buy a heavy fabric like upholstery and line the back of it with something light like cotton so it is not super heavy. Try to get a medium weight overall.
I would recommend looking at:
- Suede
- Light upholstery/Tapestry
- Velvet/Mole Skin
- Denim/Corduroy
Good for lining:
- Cotton
- Linen/Muslin
- Flannel
Avoid:
- Knit/Spandex
- Silk/Satin
- Thick Leather
- Lace
I think you can use whatever fabric you want for the design as well. Just keep in mind that it should still be durable as it could get cut by nicks on swords or caught on branches. But you could do it in bridal silk if you like since that is what our tabards are lined out of.
I would avoid adding spikes or coin trim. Avoid adding things that might damage your opponent’s weapon or could fall off.
HOW MUCH FABRIC SHOULD I BUY?
Fabric usually come in two different widths: 45 inches and 60 inches. They would say so on the bolt if you buy it in the store or in the description if you buy it online. But sometimes they are smaller or larger than those, and they would also say so on the bolt.
If you find a fabric that is 60 inches, that would save you money and be easiest for the larger cloaks. You should buy fabric that is a few inches longer than your measurements so you have room to not worry about going off the edge. If you find something you like that is shorter (like 45 inches), you will need to buy as much as the diameter of your measurement or buy twice as much as the diameter if you’re using the same fabric for both sides, plus extra for wiggle room.
So for example, I am going to make a cloak that is 48 inches in diameter and 24 inches in radius (including seam allowance). I would like to make the front out of suede and the back out of linen.
Note: the figures are to scale.
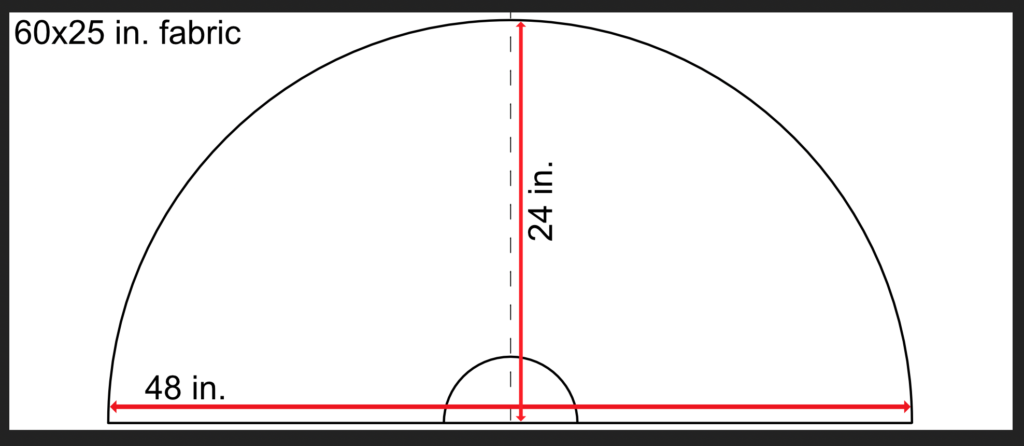
1) Since my diameter is less than 60 inches, I can just get the radius of my dimension which is 24 inches, but I would like to get some extra for some wiggle room. 24 inches = 0.6667 yards which is 2/3 of a yard. But you can also see that I’m just squeeeeeezzzing in the cloak with 25 inches. I would feel more comfortable getting a little bit more so I can make my pattern more comfortably and not worry about going off the edge. So I’m going to get 3/4 of a yard out of the suede and the linen. That would give me 3 inches of wiggle room. That’s plenty of room for me, but feel free to get more if you like.
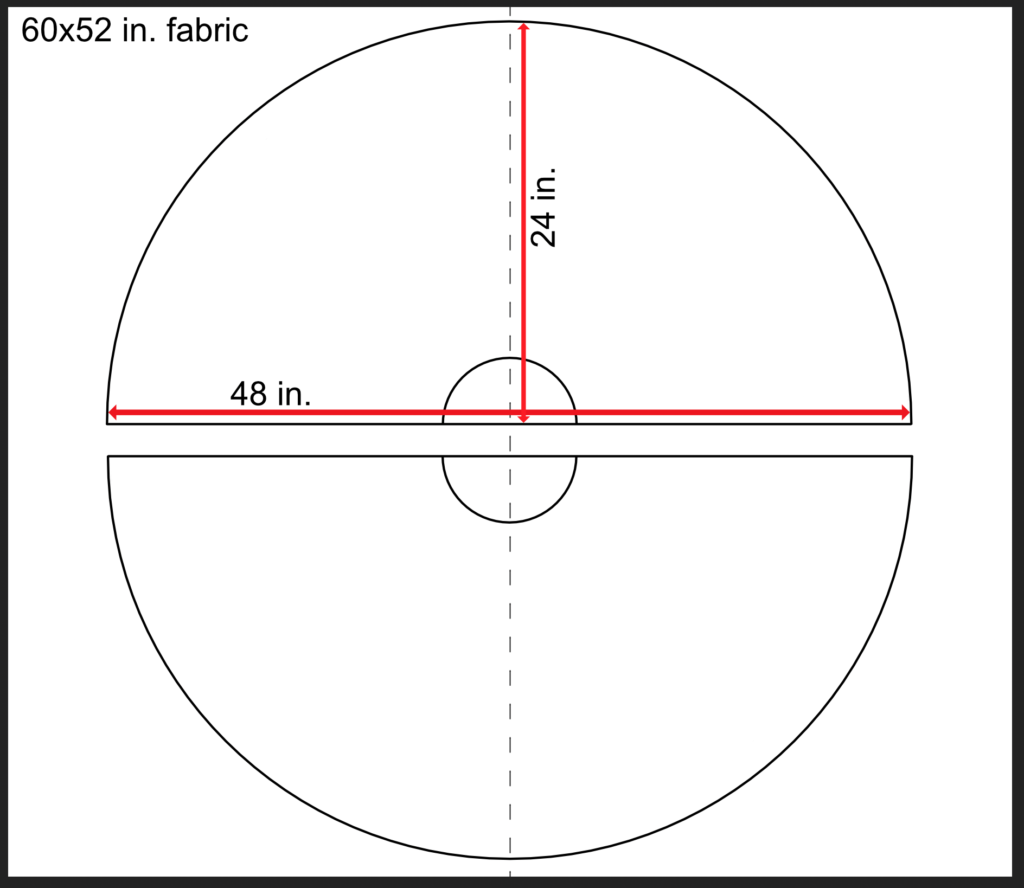
2) Now if I wanted to make the whole cloak out of just suede and I find a bolt in 60 inches, I can get 52 inches. 52 inches = 1.444 yards which is in between 1 1/3 and 1 1/2 yards. So I would get 1 1/2 yards of suede and have extra for wiggle room.

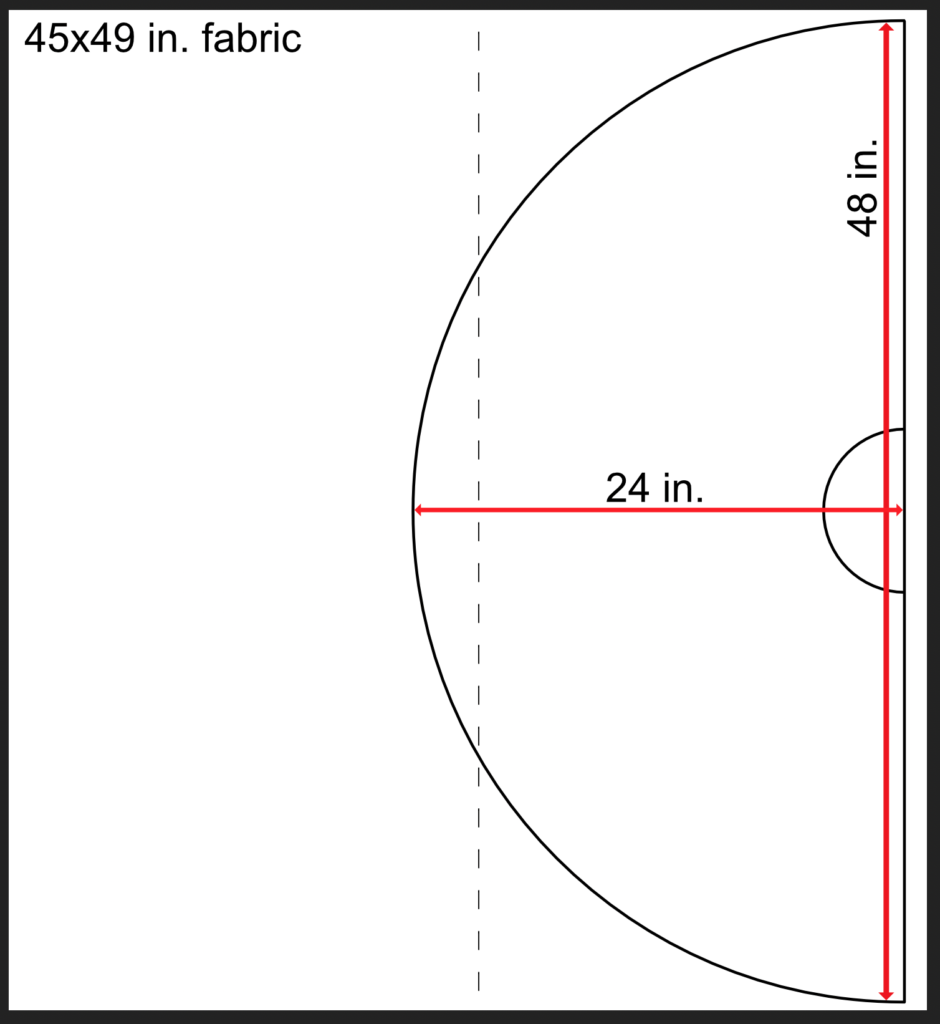
3) But say I found some fabric that is 45 inches and I wanted to make a cloak out of suede and linen. You can see from the picture that I can only fit one cloak piece on it by turning it sideways. So same math with this one. 48 inches = 1.333 yards which is 1 1/3 yards. And again, add extra for more wiggle room so I would probably round up to 1 1/2 yards of suede and linen.

4) And if I want to make the whole cloak out of the same material in a 45 inch bolt, I would buy twice as much of the material like I did in problem #2. 48 + 48 = 96 inches = 2.66667 yards = 2 2/3 yards. So I would get 3 yards for extra room.
Laying Out Your Fabric
This step will help get you set up to start marking your fabric so you can cut it and start sewing it. No matter what type or size of fabric you got, find a big area and open it up and lay it out flat. If you have fabric that has texture or a pattern on it, that is what we call the right side or the front of the fabric. Have the front be on the floor and the back of the fabric facing up so you can mark up the back and not worry about ruining the front.
If you got fabric that was cut out square-ish, be sure to remember which side is what measurement.
The pictures below represent how you are going to mark the cloak out but with your measurements. The dashed line represents the fabric when it was folded on the bolt in the pictures below. They show how you would mark it out if you were using two different types of fabric or if you were going to cut them out of the same material and which dimension you got.

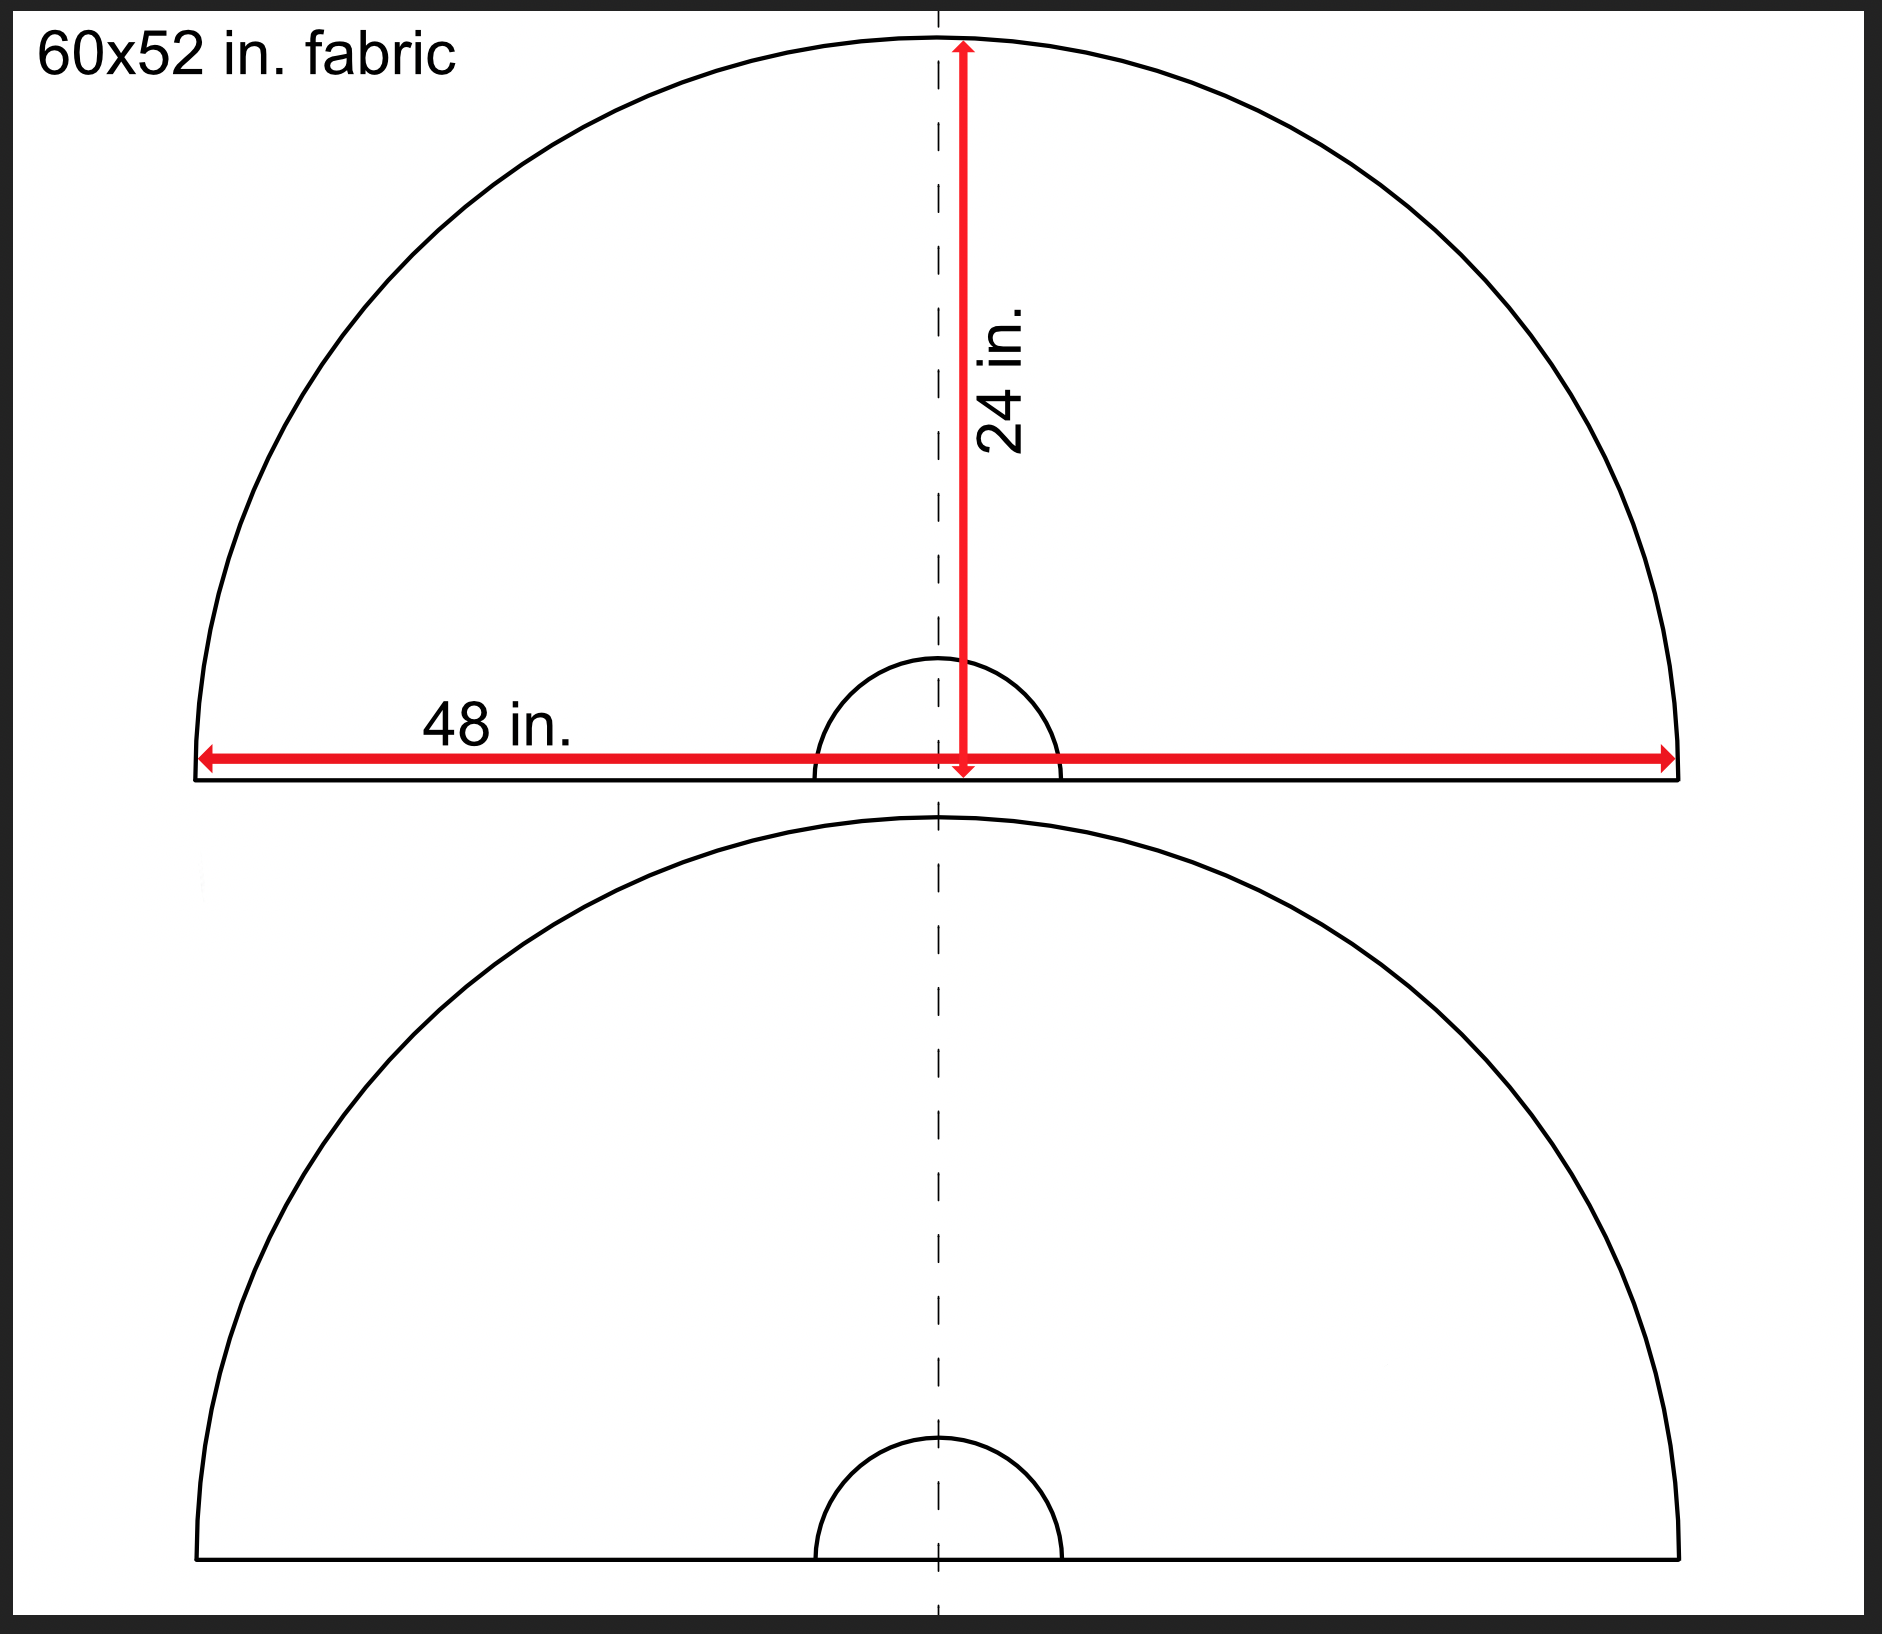
If you got 60-inch fabric, refer to the top images. The left one you would use if you are cutting it out of two different materials. The right is if you are cutting it out of the same material.
If you got 45-inch fabric or something on the small side, refer to the bottom images. The left one is if you are cutting it out of two different materials. The right one is if you are cutting it out of the same material.

Making Your Pattern
What you’ll need to make a pattern:
- measuring tape (or a ruler and string)
- yard stick (or something with a long straight edge)
- pins, chalk, or colored pencil (anything that will show up on your fabric)
- possibly another person to help
You could make a paper pattern on wrapping paper or by taping multiple sheets of paper together if you feel more comfortable using a pattern on your fabric. Otherwise, just follow these instructions on your fabric.
Our side cloaks are just semi-circles. To make the pattern, we will be creating it with a make-shift compass. If you don’t have a measuring tape, find some string and a ruler. Measure out your string to your finished measurement plus 1/2 inch for the seam allowance.
- Using a yard stick (or something that is long and straight), mark a straight line that is as long as the diameter of your cloak on the widest edge of your fabric, about an inch from the edge.
- Find your half way point on the line you just drew and put a little mark there.
- Place your measuring tape or string on that mark. You may want to tack it down with tape or a pin or have someone hold it for you.
- Then, starting from one side, mark out your radius (with the 1/2 inch seam allowance) in a circle till you reach the other edge. Use pins or chalk or something that will show up as you go along to mark out your semi-circle.
- Leave your measuring tape or string where it is in the middle, measure 5 1/2 inches from where it is tacked down, and pin or chalk another semi-circle for your hand area.
If you are making the front and lining out of different materials, then you’ll need to cut one semi-circle out of each fabric. If you have one material, cut two semi-circles out of it.
After you cut one out, you can just use that one to lay on the other fabric and cut around it instead of making a compass again.
At this point, you can sort of twirl it and see what you think of the length. You can pin both fabrics together and get a better idea if you like. It will be a tad shorter when it is sewn but will be similar enough. If you want it smaller, just measure from the round edge how much you would like to take off and cut it off.
Design
This is the fun part. If you want to put any designs on your cloak, I would sew/attach it on before starting any sewing. That way the pattern doesn’t show on the back (or maybe you would like that, in which case, sew it on at the end), and the edges of it are sewn in the seam allowance. But up to you.
Sewing
1) Put the front sides of the fabric together and sew 1/2 inch from the edge of your fabric around the outside of the cloak and along the straight sides. Don’t sew the hand area yet.
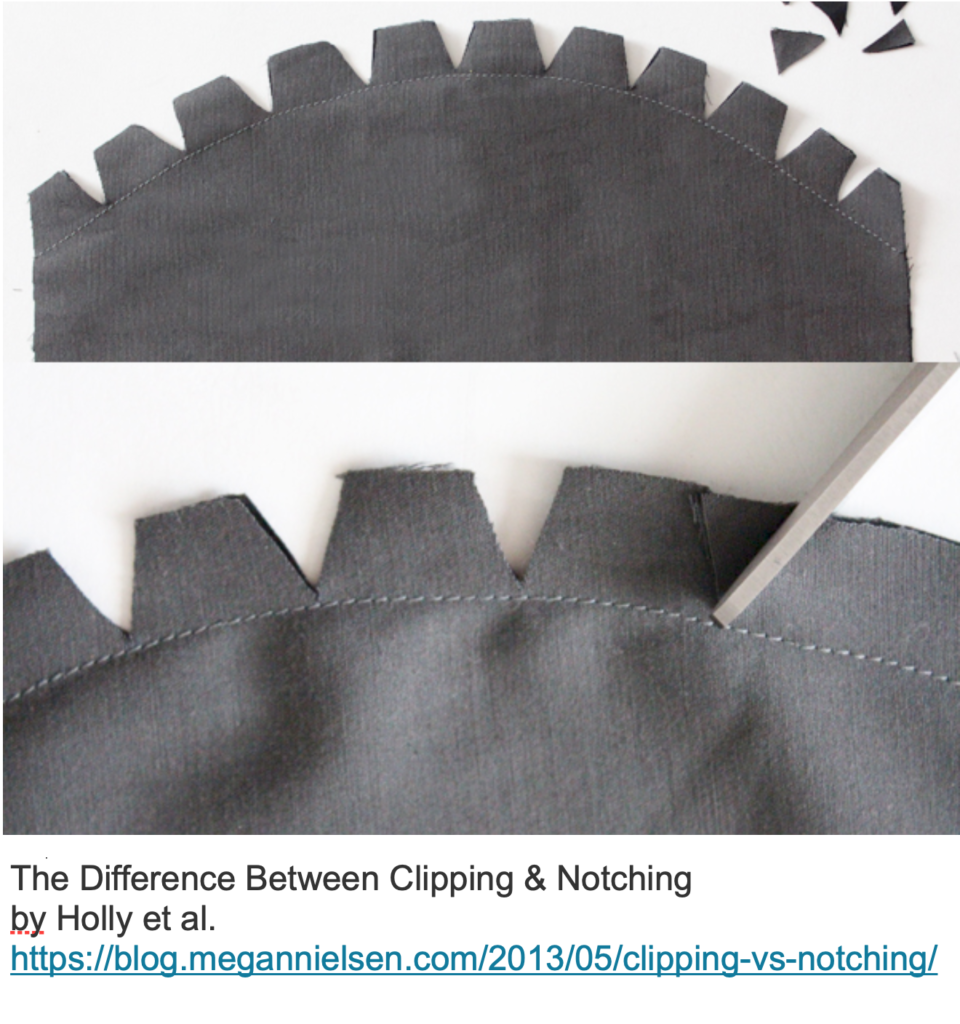
2) Clip the corners and notch the round edge of your seam allowance as shown in the picture to the right. This way it’ll help the fabric be flat and nicely round when you turn it inside out.
3) Turn it inside out. Iron the edges.
Edward’s and Shay’s cloaks have the seam sewn down on the outside as well, about 1/4 inch from the edge. You don’t have to do this but I would recommend doing it. Doing so will help the cloak hold its shape when being twirled and keep it flat and rigid.
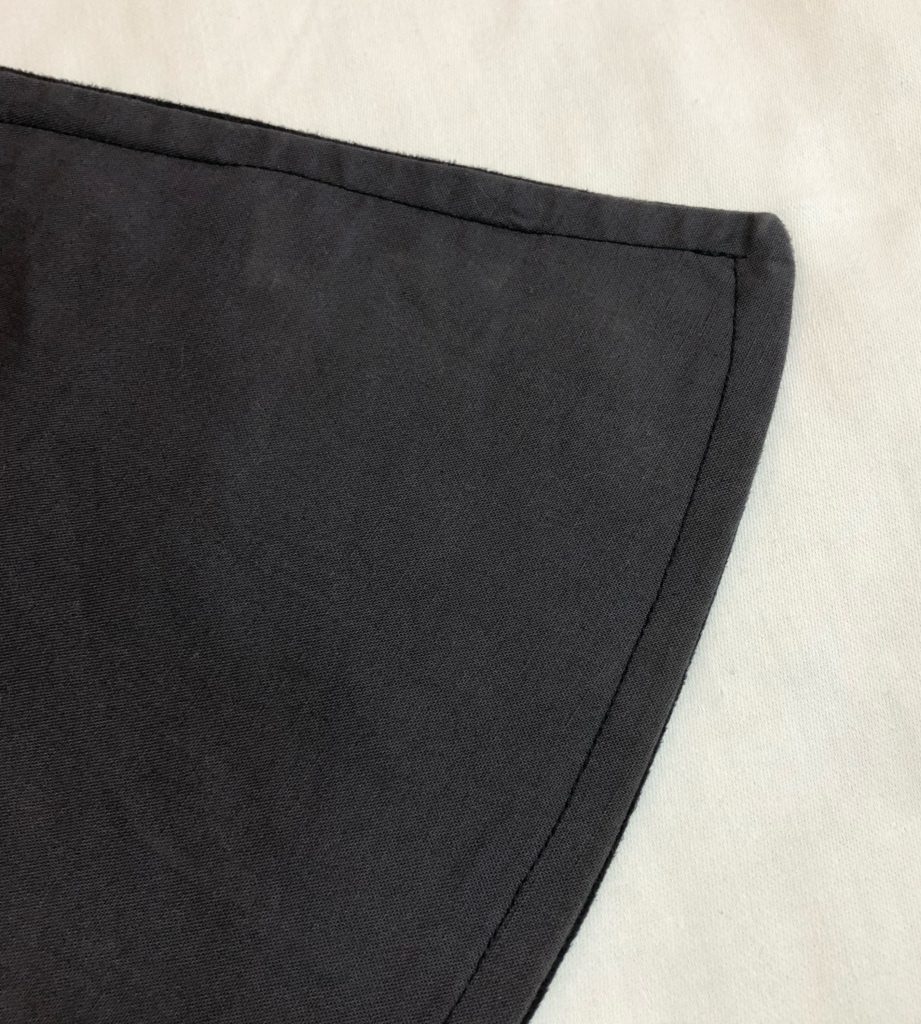
Edward’s cloak clean, crisp edge from being sewn down 
Loaner cloak not sewn down
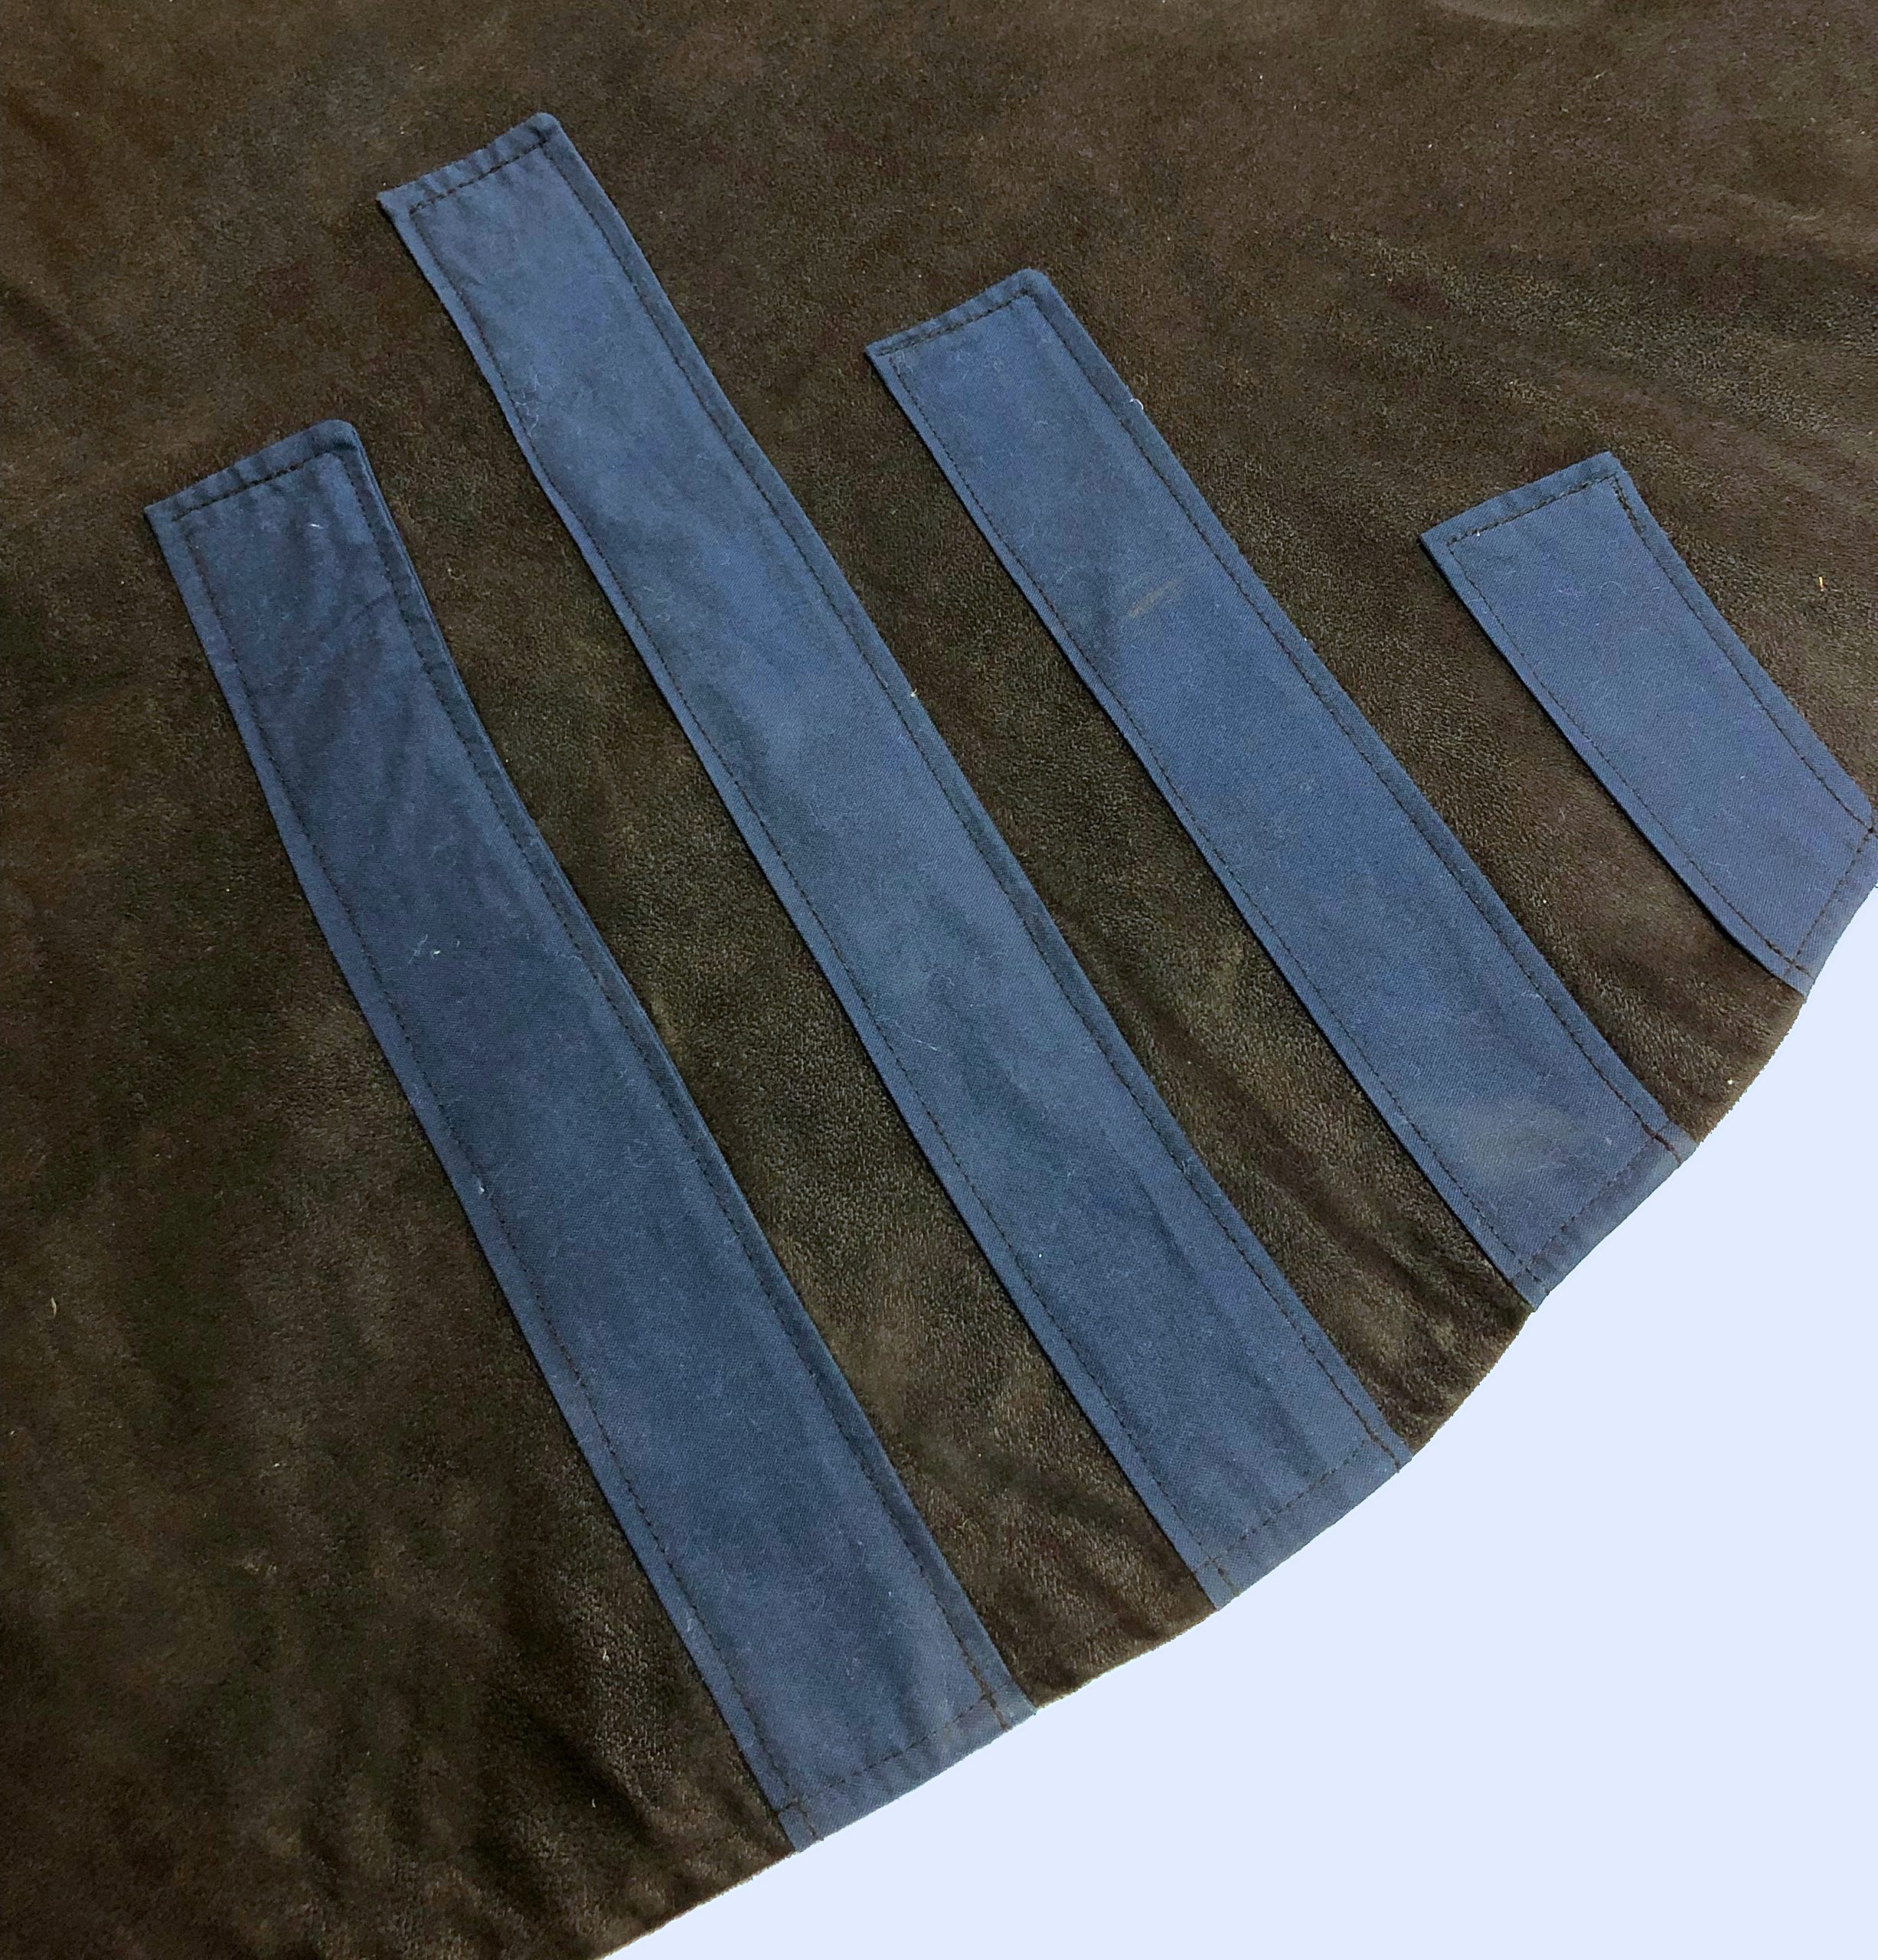
4) For the hand area, Edward’s has a rectangular shape on it that is folded over and sewn down as you can see below. I like it because it gives you a little extra grip to hold onto while twirling.
You could buy some bias tape that coordinates with your cloak and sew it down around the hand area. Or, if you have some leftover fabric, you can cut a strip of fabric on the bias to make your own bias tape and sew it on the hand area. Here is a website that can show you how to make your own bias tape. https://blog.treasurie.com/how-to-make-bias-binding-tape/
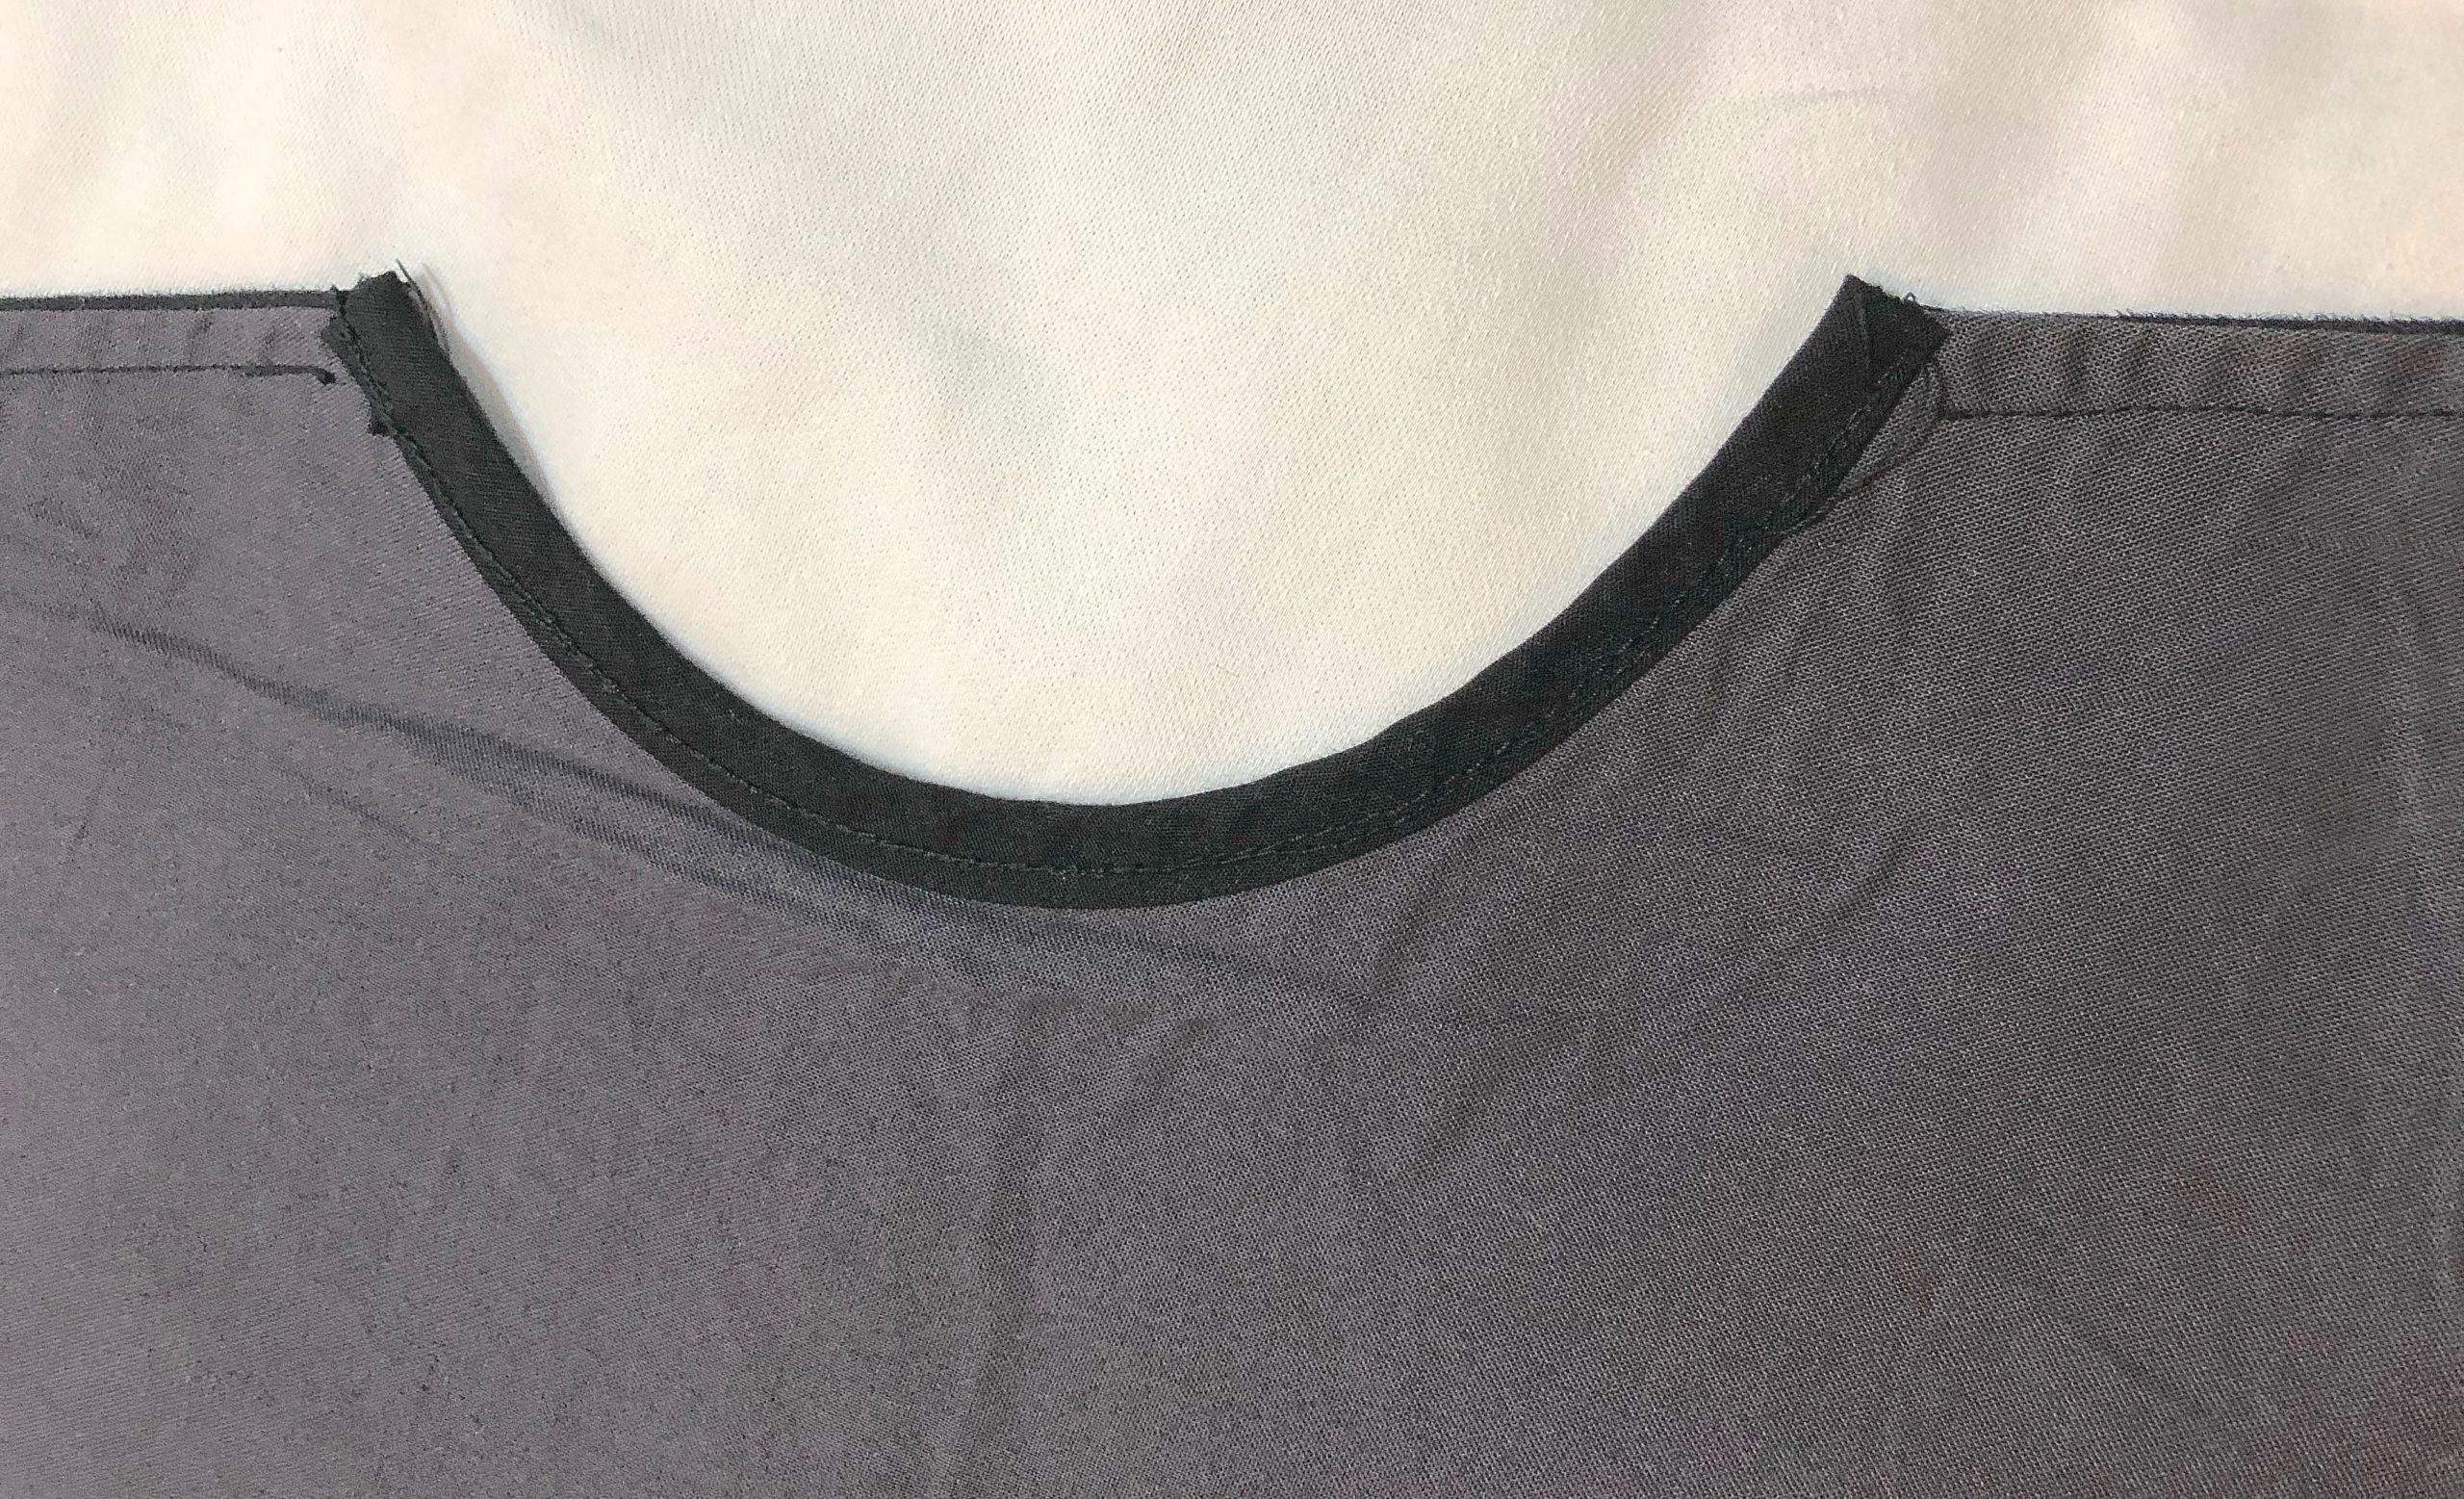
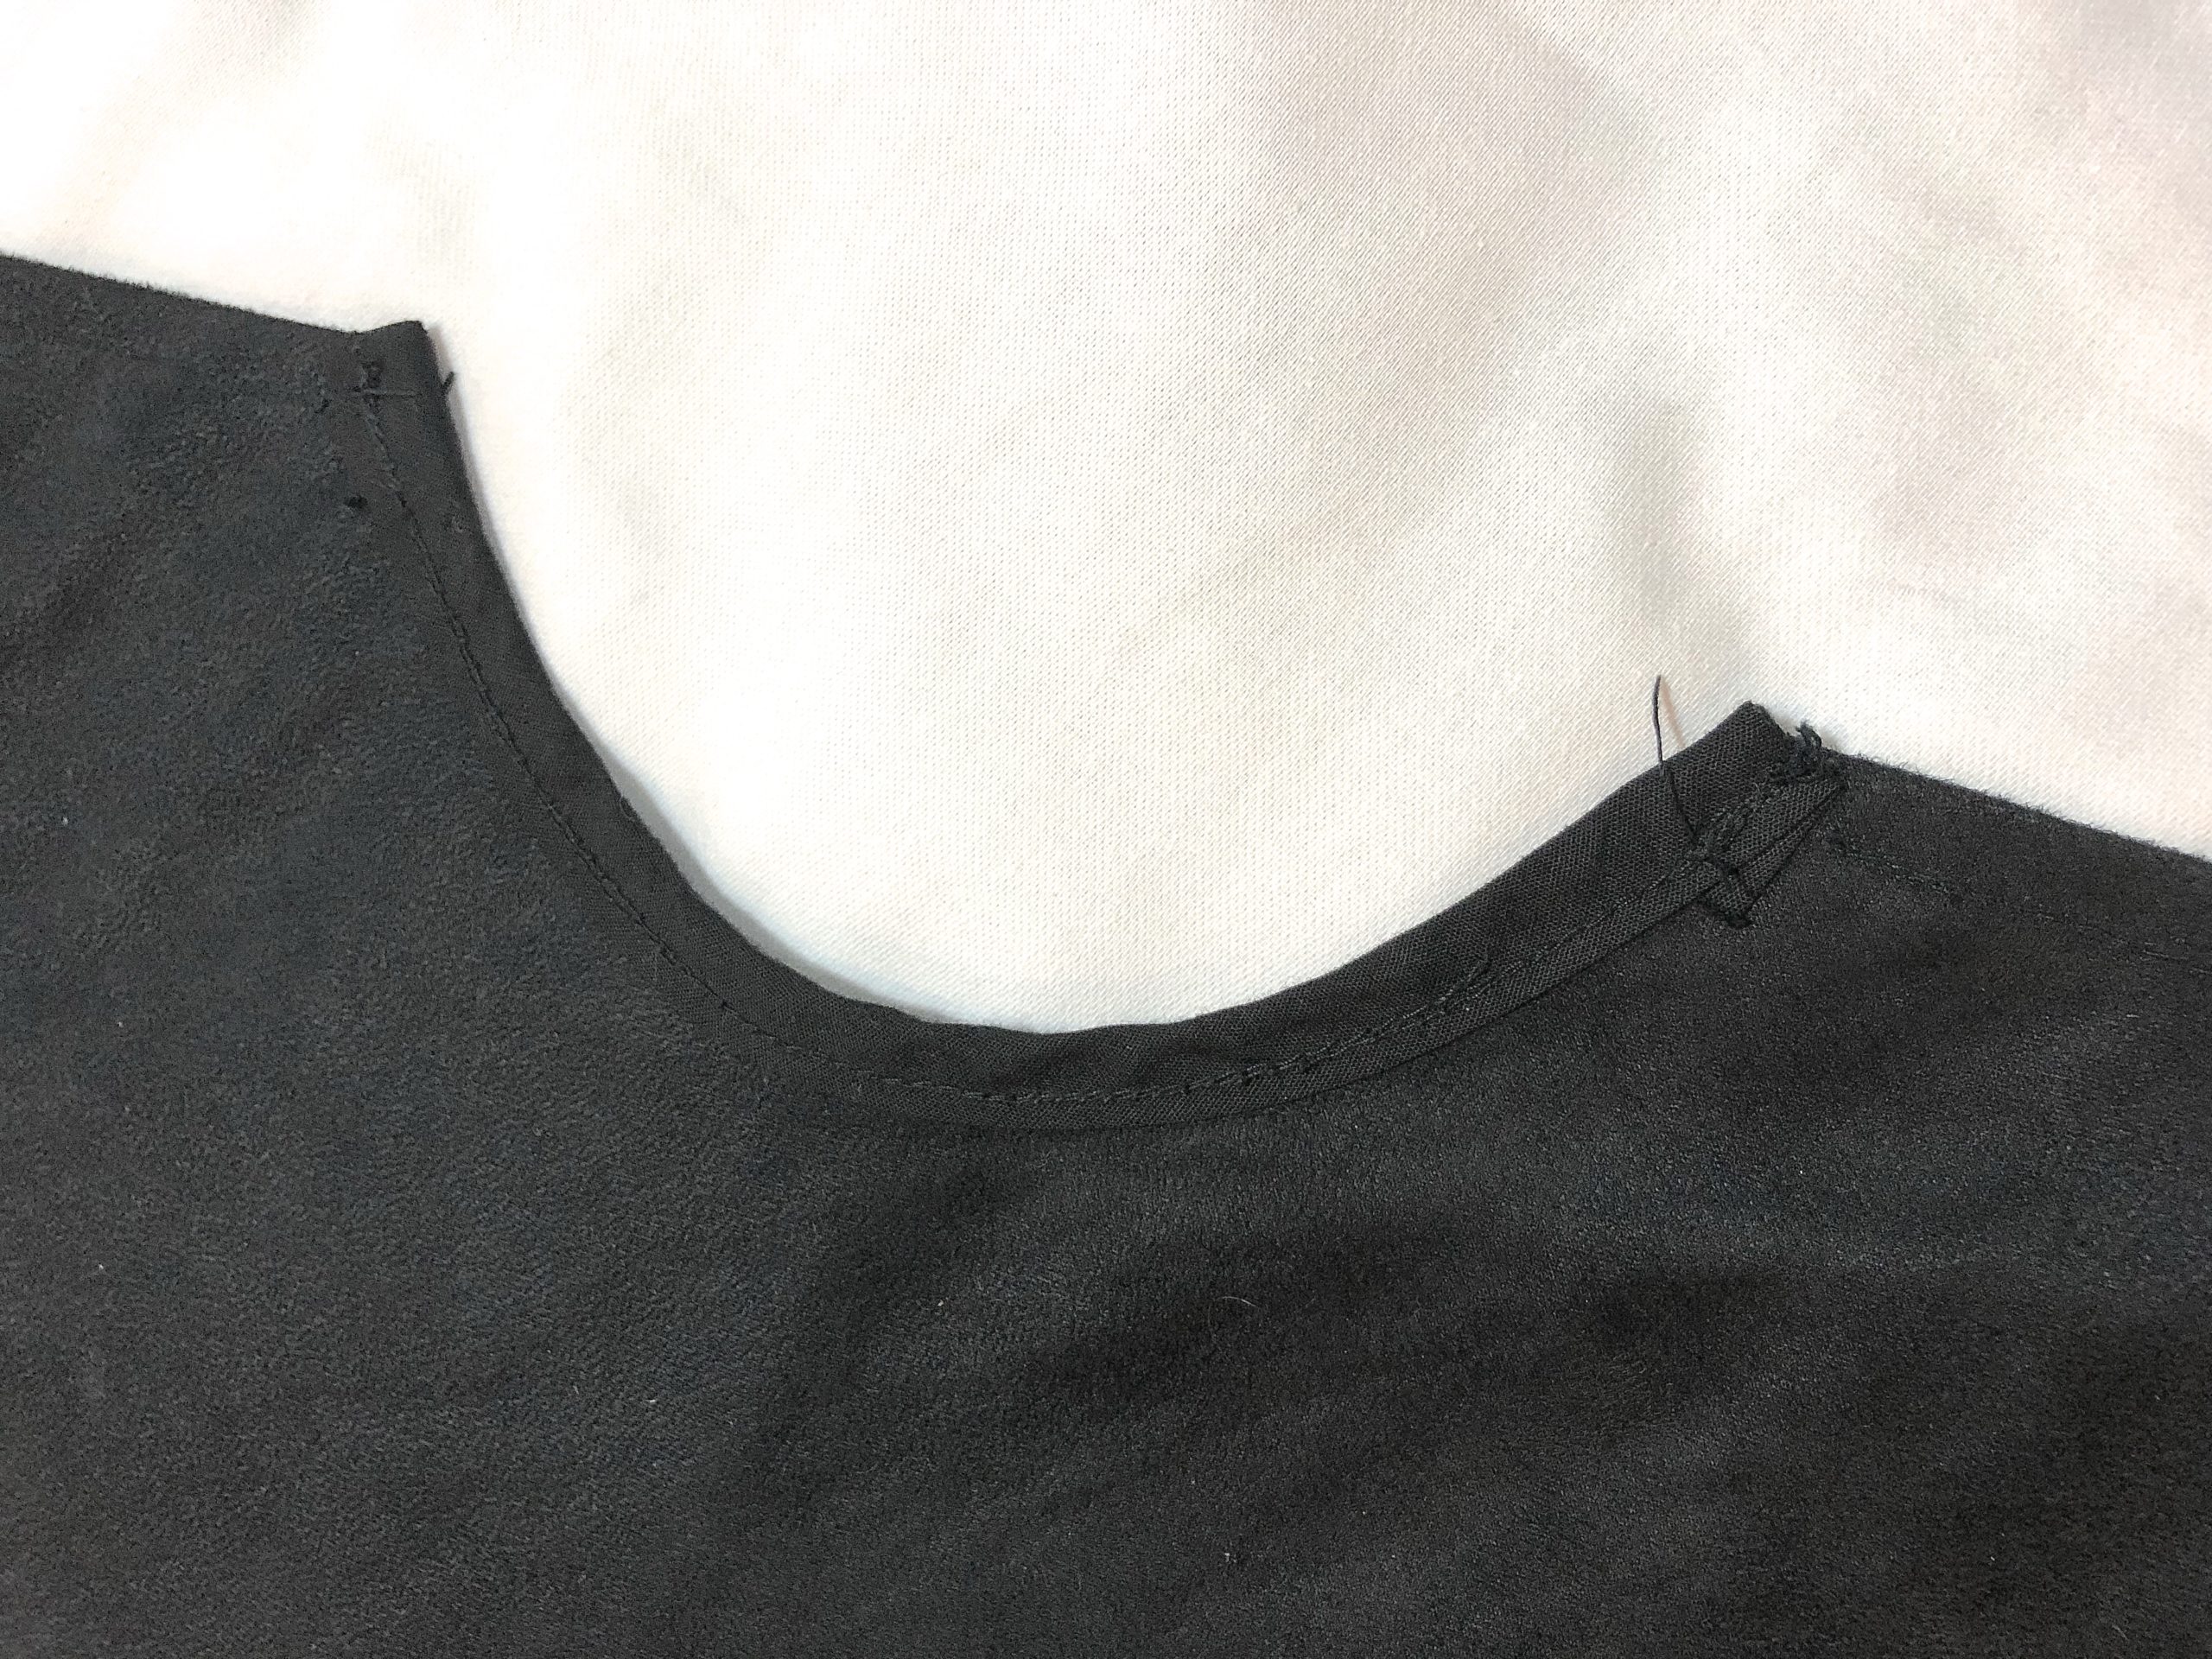
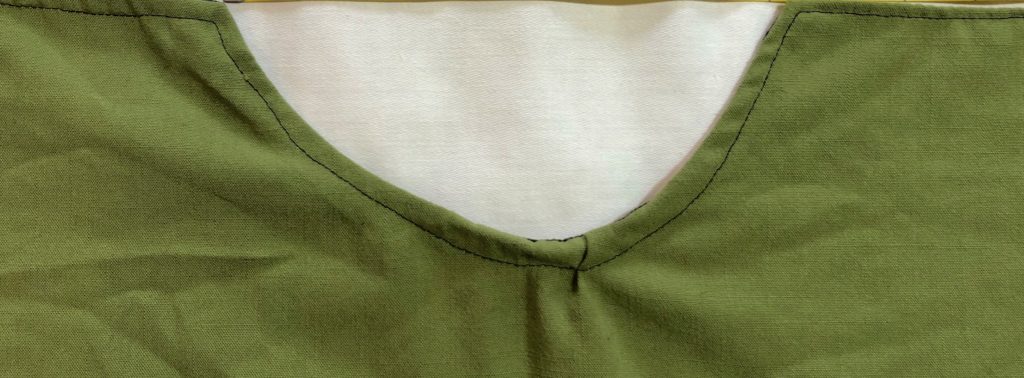
But if you don’t want to do that, you can mark on the inside (or the outside with something non-permanent) a 1/2 inch line in from the edge of the hand area, then clip the curve like in the picture with the gray fabric below. Fold in on the line both sides of the fabric, iron it, and either hand sew it closed or topstitch it down to keep it closed like Shay’s down below.

Voila! You now have an awesome and deadly cloak to terrify your opponents. Enjoy!