This article will go over how to install and use Discord! You can use Discord without needing to install it’s application onto your computer, however it will not allow you to customize some very important items if you use it in this manner.
To help with decision-making:
Do you not care about using Push to Talk and would rather just listen? Follow the Using Discord without installing instructions.
Would you like to have the option to talk to others and do it in a manner that is easy and simple? Follow the Using Discord by installing instructions.
Using Discord without installing:
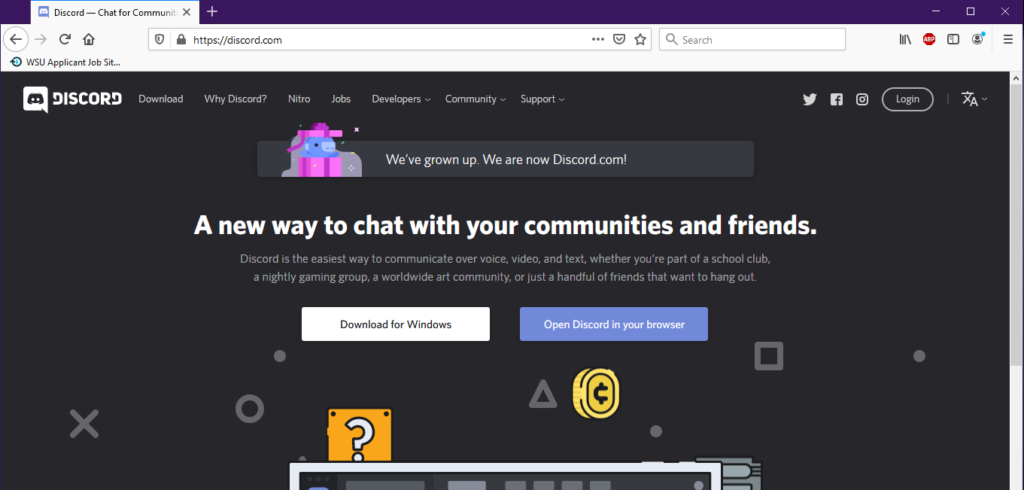
- After clicking the button that says “Open Discord in your browser”, it should look something similar to the image below.

This will be where you will enter your name, we’d prefer if you used a name that the Order of the Rose knows you by!
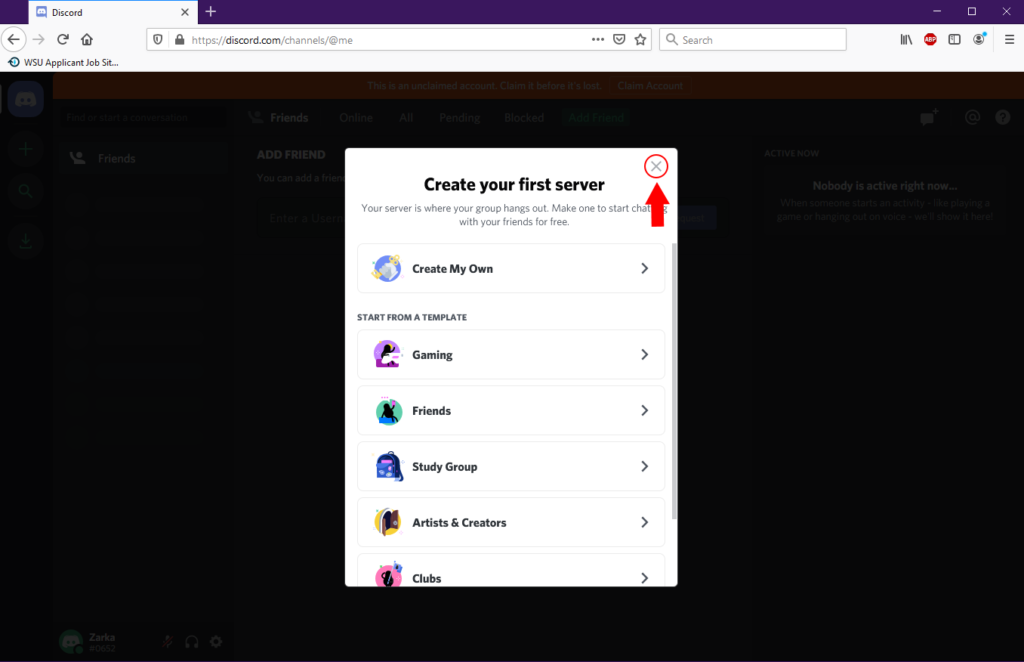
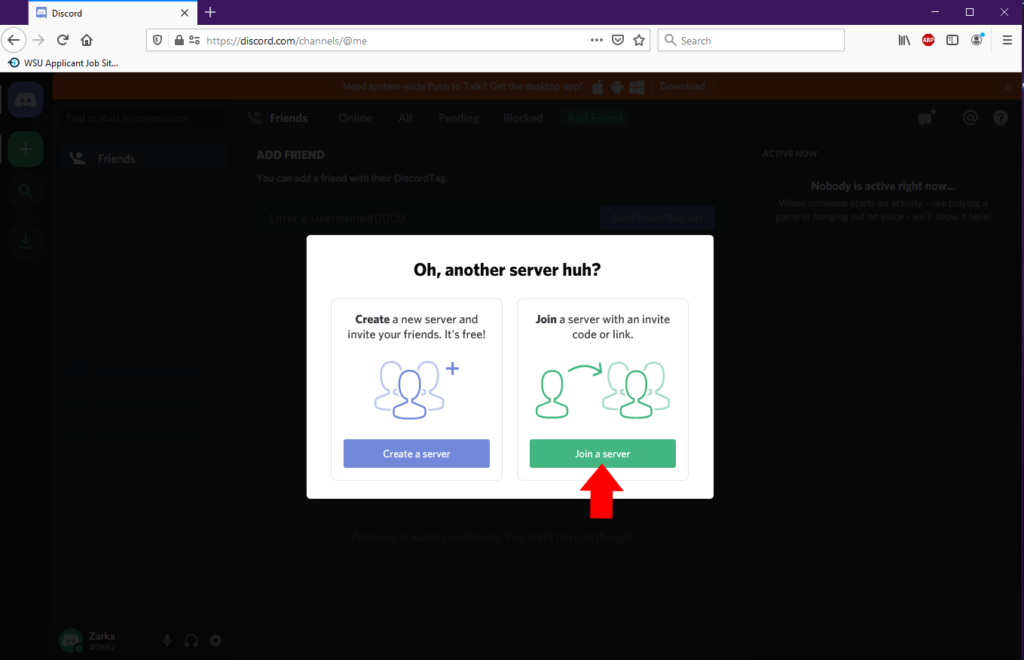
- After this, it will ensure you are not a robot, and then ask to create your first server, similar to the image below. For now, you don’t want to create your own server as we already have one, so click on the indicated “X” as shown in the image.
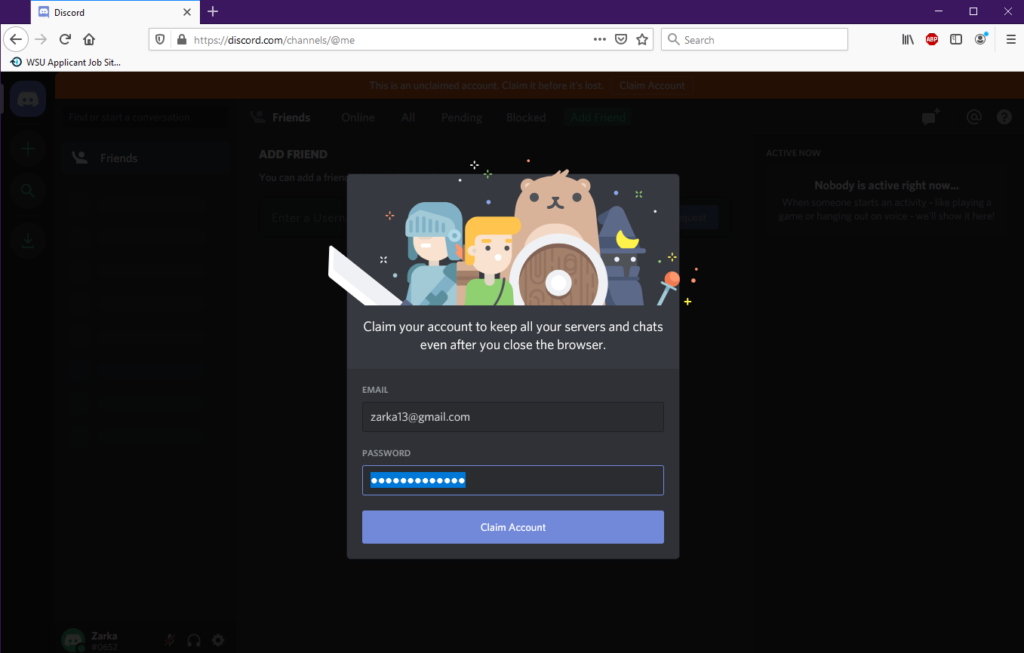
- It will then ask for an email and password so as to be able to come back to here again without needing to do all of this all over again! Make sure to have your email ready to receive a notification when you are signed in. The password field is asking to put in a new password for this account, make sure to remember it!
- After this, it will ask you (or rather tell you) to get the Desktop App! If you click on this, please follow the instructions found in the “Using Discord by installing” instructions.
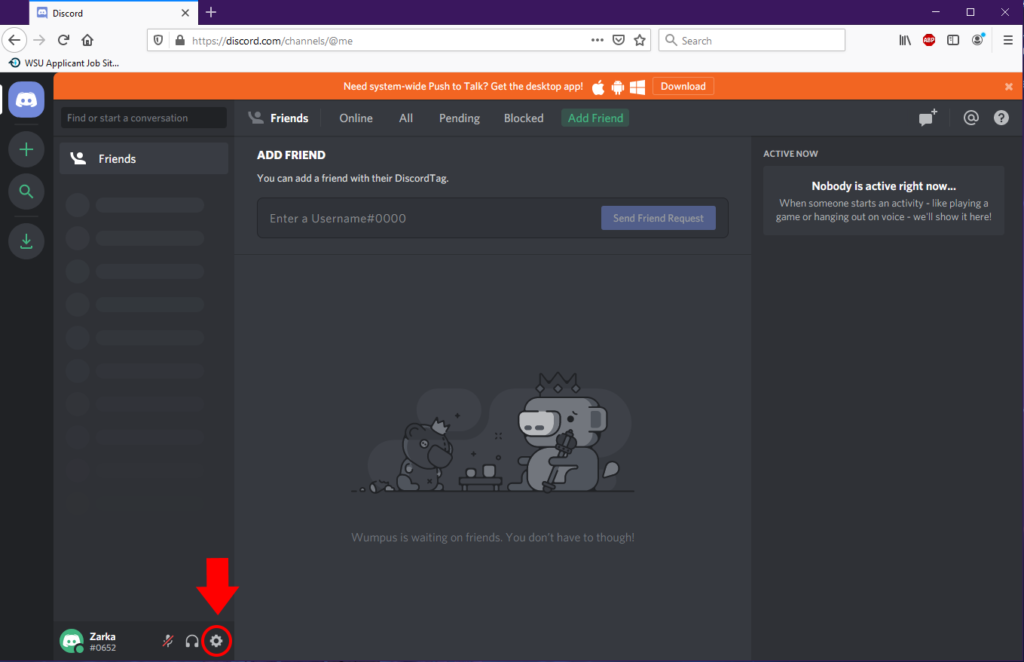
- Now if you still want to use this via your web browser; after you click on the x at the top right of that box (the one that pops up saying “Please get the Desktop App” – or something like that), your screen might look something like the image below. We can get you setup first by looking at your settings. Click on the icon as indicated in the image:
- At this point, we need to make sure you have your sound settings and volume levels set properly, so we can hear you and you can hear us! Discord makes it easy to test and make sure you can be heard and can hear everyone, however sometimes even after this step is completed, you may find that some people’s microphones are quieter than normal (or louder), and we’ll show you how to help those instances too.
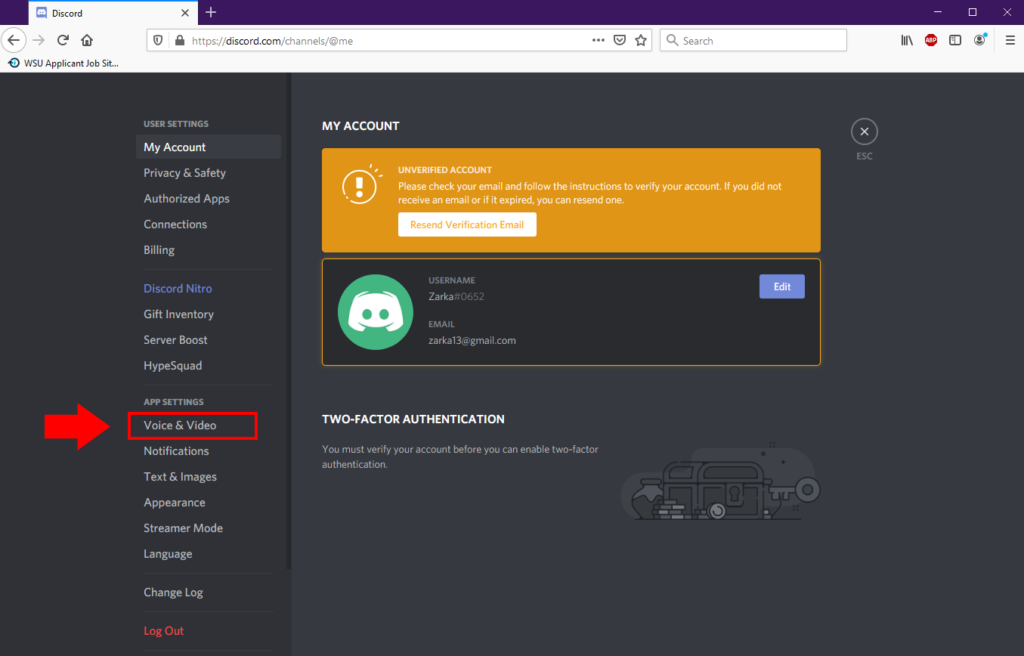
As indicated in the image below, click on the highlighted text to go into your sound settings for Discord.
- Upon clicking this, your screen might look like the image below.
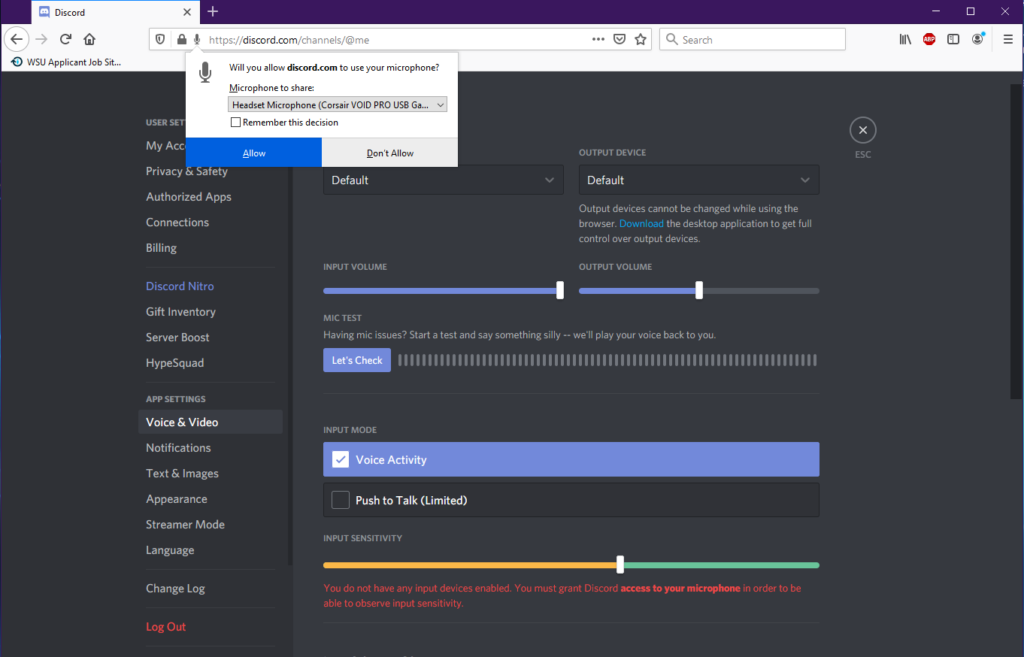
- You will want to click on the button that says “Remember this decision” before you click on “Allow”, as then it will not ask you every time you start Discord via this web browser. However, if you start up Discord using a different web browser, you will need to ensure to apply the same steps again as here.
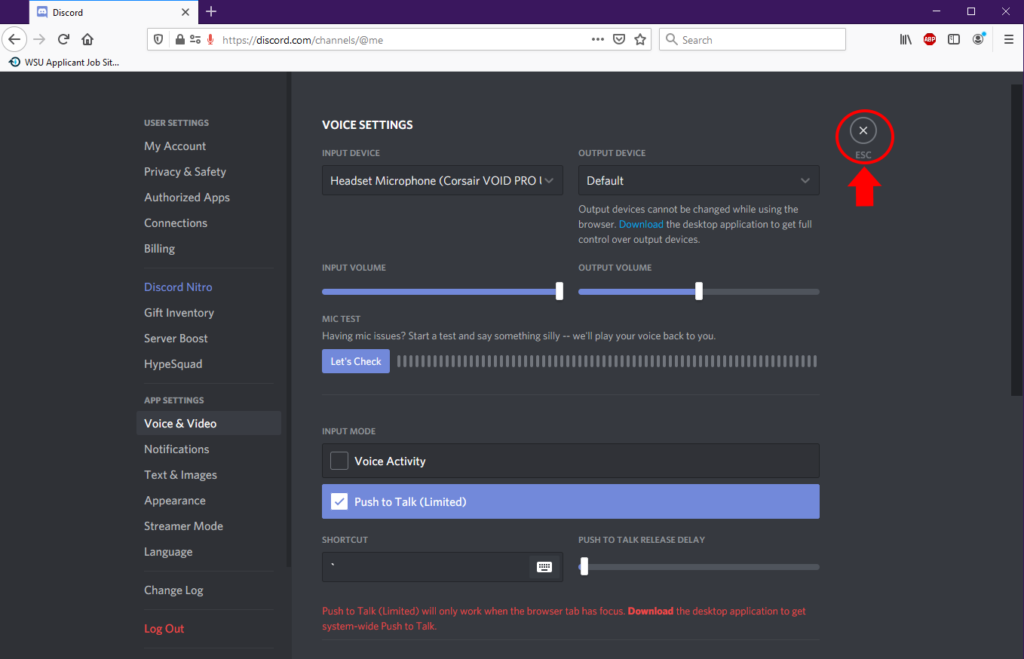
- After this is done, it *should* recognize you have a microphone and appropriately indicate which input device you are using (known by the name your computer will list it as within the drop-down box underneath “Input devices”). If you have any issues, let an officer or sage know via Facebook message and we will help as best we can!
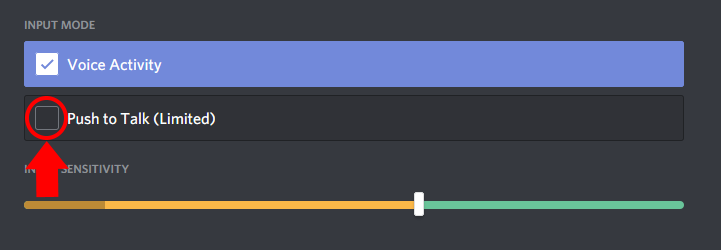
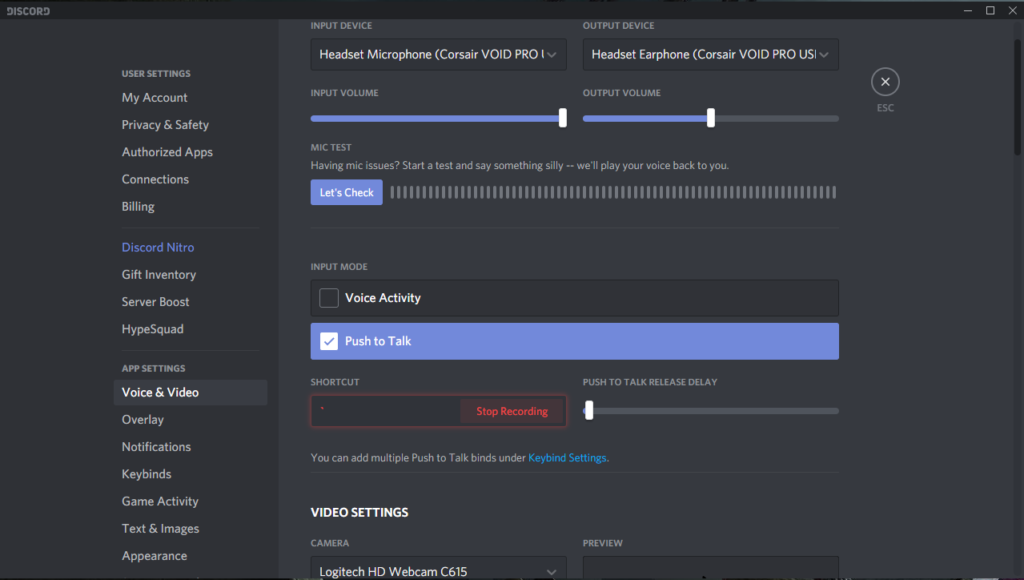
- At this point, we would prefer to use “Push to Talk (Limited)” method of conversing. What this means is you will need to setup a keybind to push in order to speak within the Discord’s Fencing Conference voice channels and other servers on Discord. This will also help limit any background noise that may happen. Follow the images below:
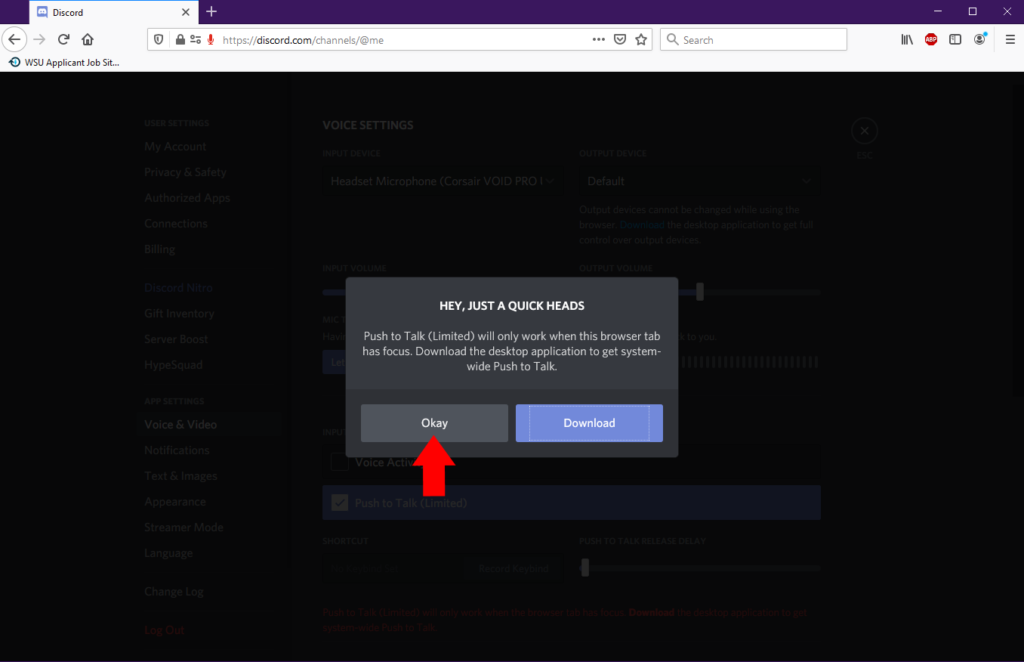
- Discord will immediately pop up with the image telling you that this feature will only work while the browser window is active. What that means is, you need to have the Discord showing and not click any where else while you want to talk. If you do click on another application or window, you will have to re-click on the Discord window to allow the push to talk to work again.
- After you press “Okay” as indicated in the image, you will need to setup a keybind. Click on the “Record Keybind” and press a key that you will remember to use whenever you want to talk or respond to the group! My suggestion would be to use a key which is rarely used, so you don’t accidentally press it if you are going to do other things.
Here in the image I have it set to “`” which is the key that is left of the number 1 and above the “Tab” key, also known as the Tilde key.
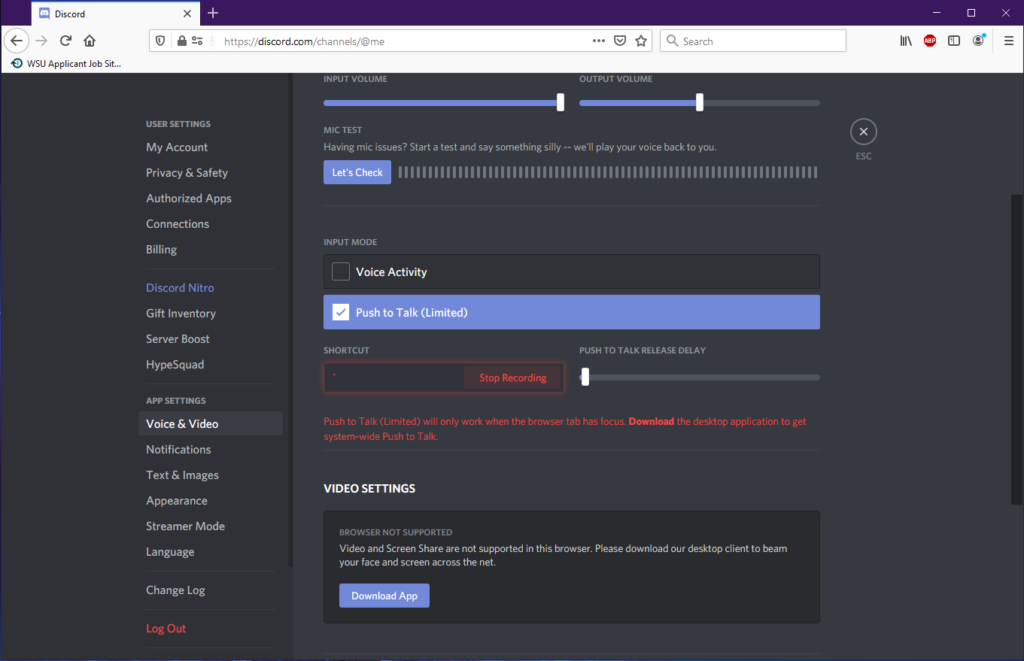
- After you have pressed the key you want, click on the “Stop Recording” button. Now we can press on the “Let’s Check” button and test to make sure Discord can hear our microphone! Make sure to press your key to start talking to test your sound, otherwise you won’t be hearing anything. If it seems quiet or loud, make sure to adjust the “Input Volume” slider as needed (moving the slider to the left will lower the volume of your microphone, and right to increase the volume of your microphone), but be very careful! There are other ways to improve your microphone volume if you are still too quiet, those are listed in the “Other Troubleshooting Issues”.
- Now that we are ready to be heard, on to joining the Fencing Conference Server! Follow the images below to do this:
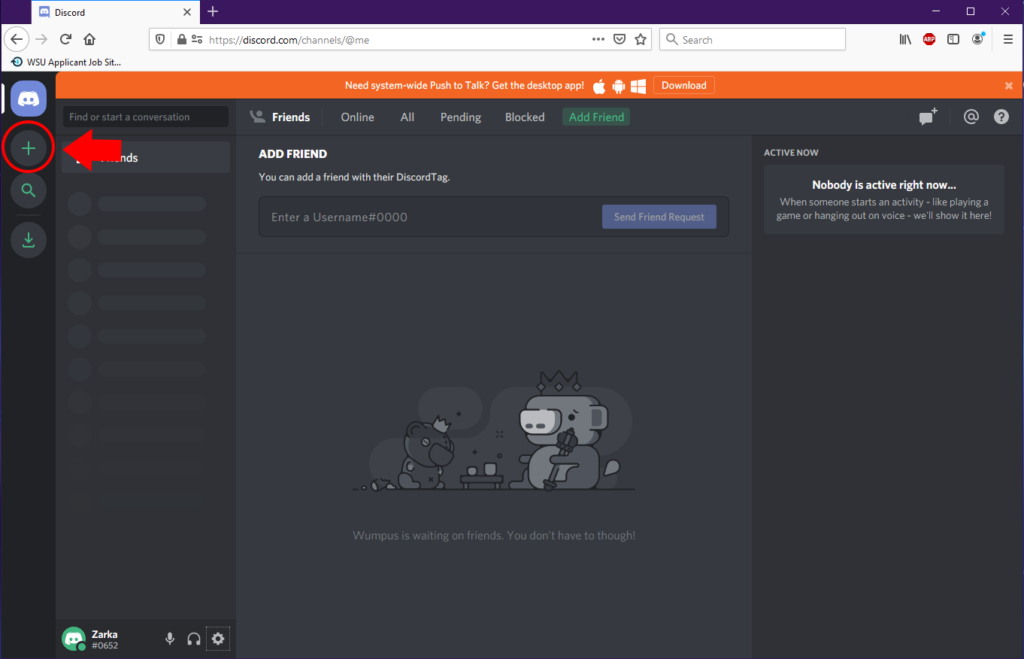
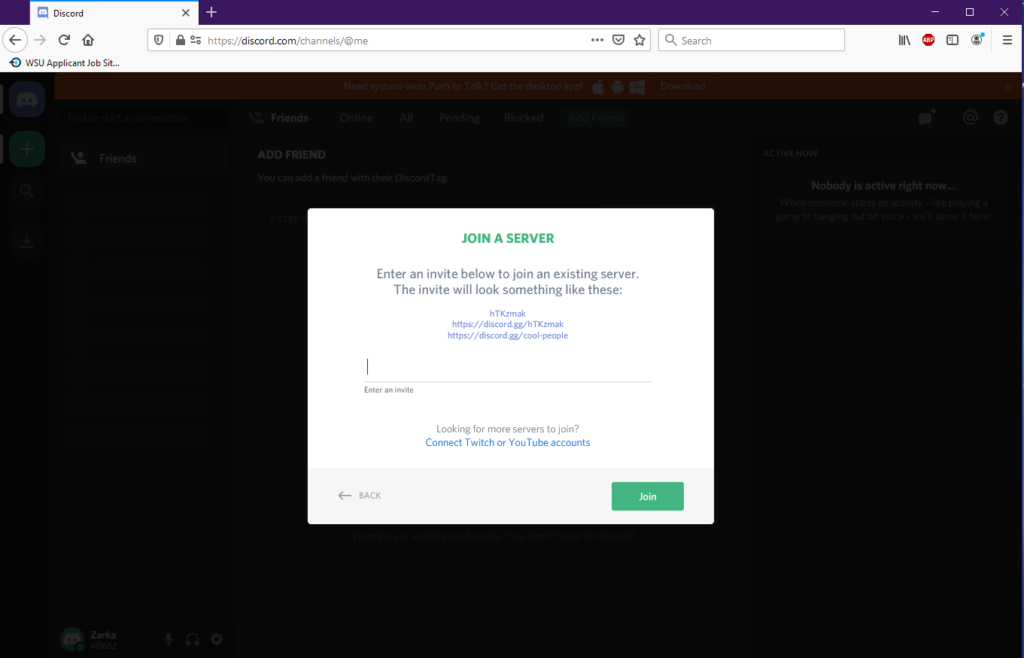
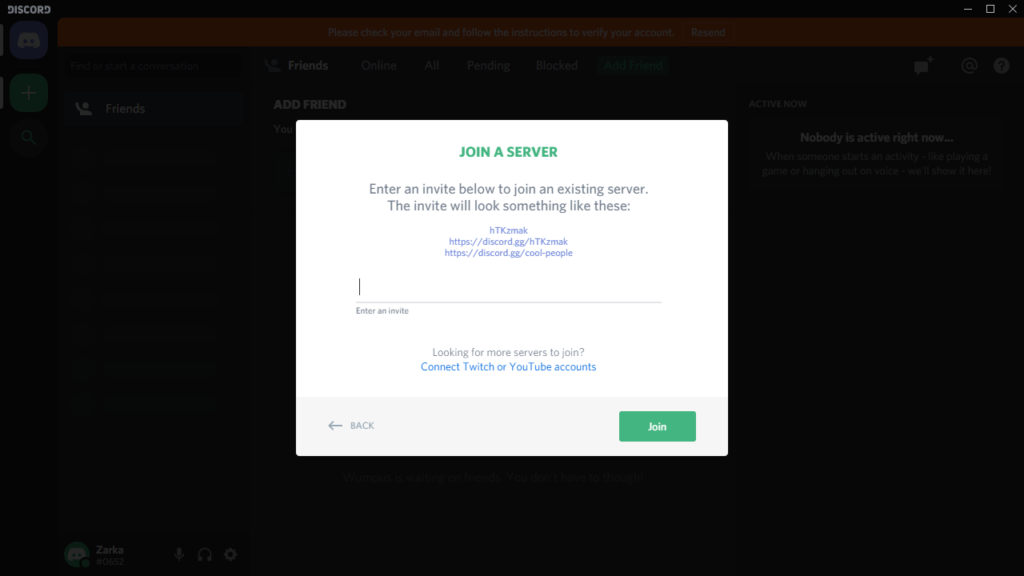
After this point, it will show the image below. Make sure to copy the link below as this will allow you to join the Fencing Conference server for Discord!
https://discord.com/invite/zdUNY7R
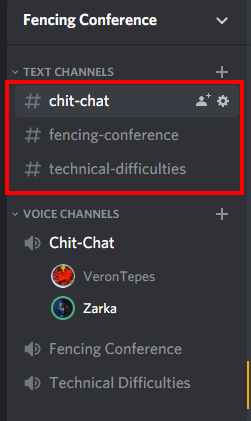
And there we are! You’re now ready to start discussing with your fellow fencers on Discord in our Fencing Conference! There are text channels and voice channels you can browse through, and click on to join and begin your flurry of words and typing! Don’t forget to go into the “#chit-chat” text channel and say hello! And if you are using a name that isn’t familiar to the Order of the Rose, be sure to mention who you are in that channel so we can appropriately identify who you are!
Make sure to check the “Advanced Discord Tips” for other areas that may interest you, like turning other people down or up, and changing your profile picture or account name/server nickname!
Using Discord by installing:
- When you select “Download for Windows” (or Mac, if you’re on a Mac device), follow the on-screen prompts:
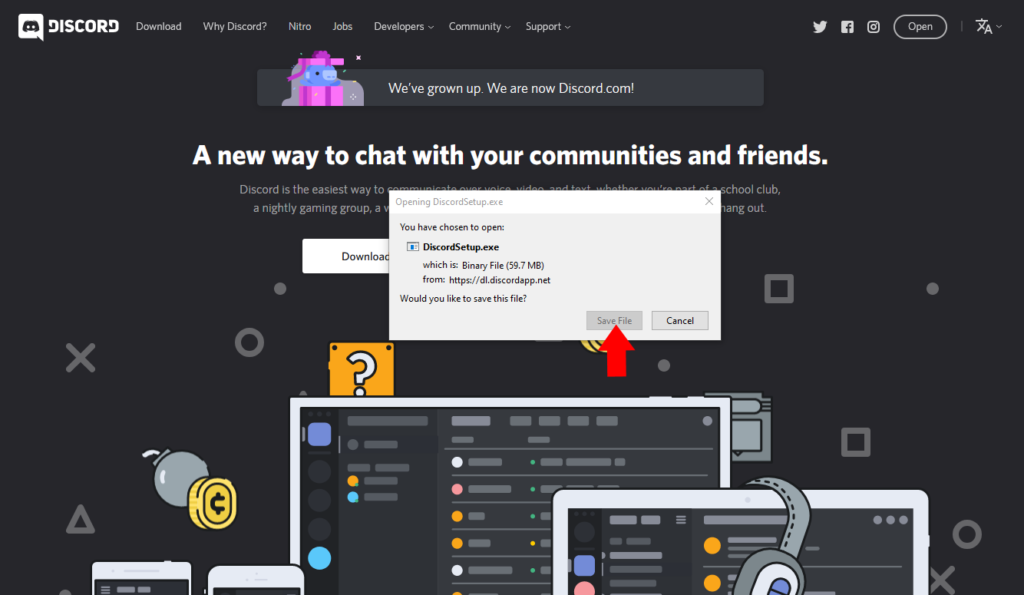
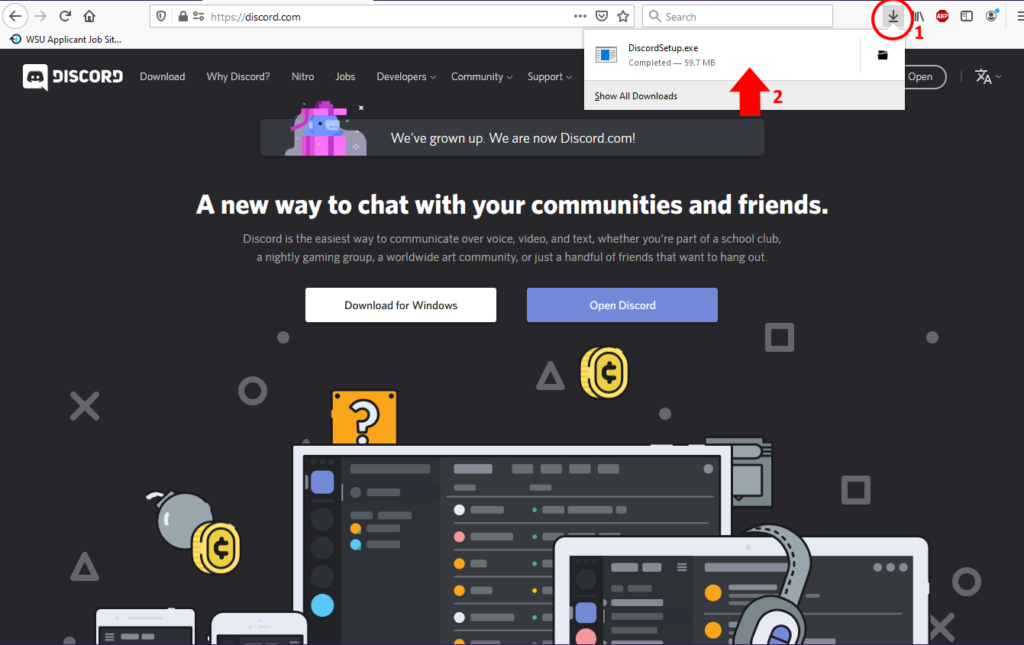
- At this point, it should automatically install for you, with some quirky sayings while it’s doing it. Eventually you should come to this screen, or some form of it:

- If you do not have a Discord account, be sure to make one by clicking on the “Register” word as highlighted and follow the instructions there on how to do that. Be sure to have the email you will register with open in some way so you can verify your account to stay signed in and keep your account!
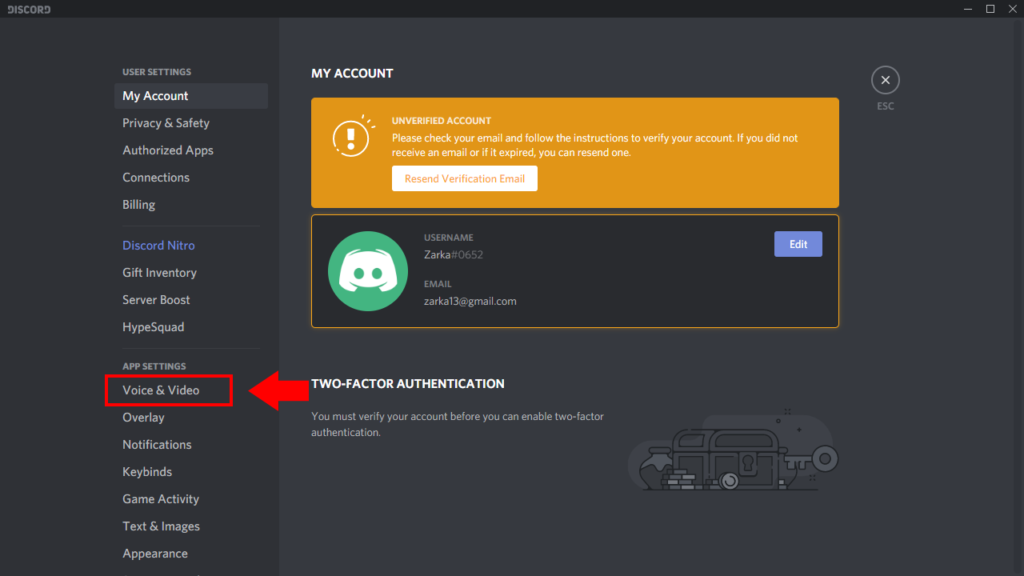
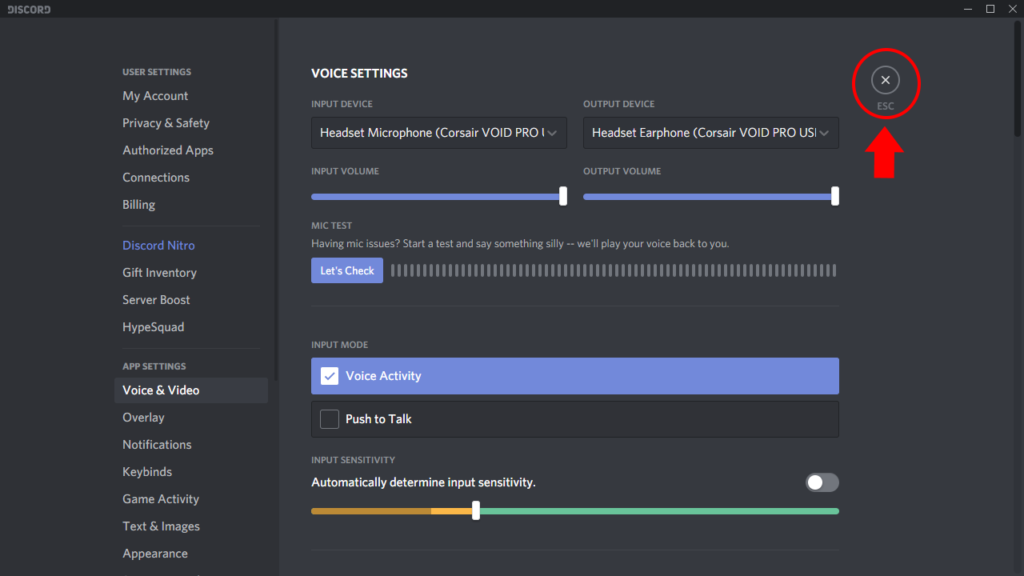
- After you’ve made your account and signed in, you should have a screen that looks like this:

- We will need to go in and fix a few things in your settings. Follow the image above to get to your settings for your Discord client.
- Here you will see what Discord is considering to be your input and output devices. You can change these as needed, but it usually will try to detect your normally-used devices for you, so unless you know which one to use, you shouldn’t have to worry about changing these top bits!
- We would prefer that you utilize the “Push to Talk” rather than voice activated. So within this window, please select that checked box instead of the default-selected “Voice Activated”.
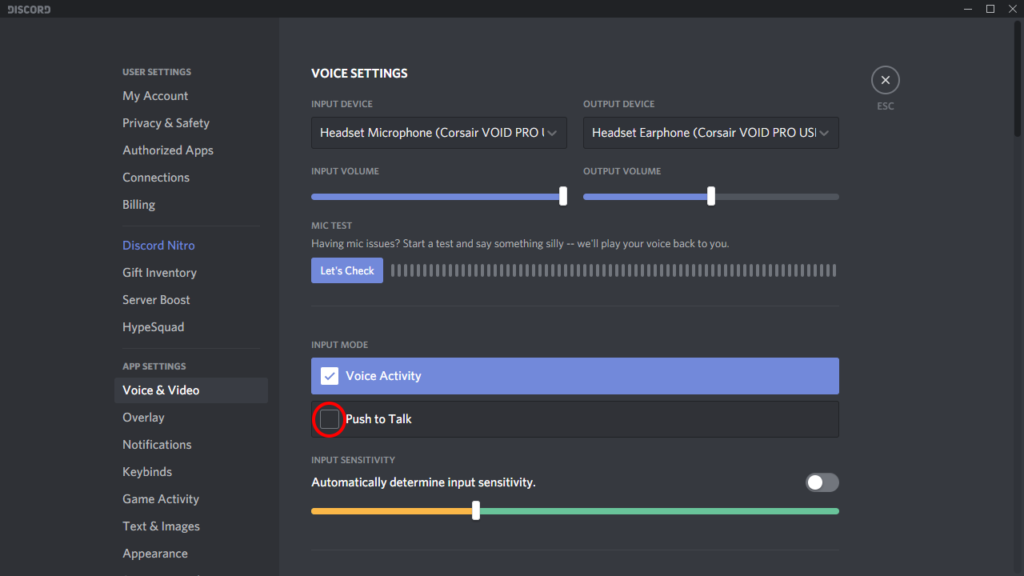
- After this point, it should show that your Keybind is automatically set to “Caps Lock”, depending on whether or not you would prefer that, just remember, the next time you type it might be turned on! I would suggest changing this to something else, I usually use the Tilde key, which is the button to the left of the number 1 and above the “Tab” key.
- After this, you can test your sound by pressing the “Let’s Check” button just above where we were. There Discord will listen to your microphone and repeat the sound to your input device. This way you can test how loud or quiet you are and adjust your input and output volumes accordingly. (Make sure to press your Push to Talk button while you’re testing!) The input volume is how loud your microphone is, the output volume is how loud your speakers are.
- Here you can also test to make sure your video camera is working too, just scroll down a bit to find those test-settings if you intend to use your camera during our conference!
- Now that we’re done with settings, let’s go join the Fencing Conference server! Follow the images below to do that:
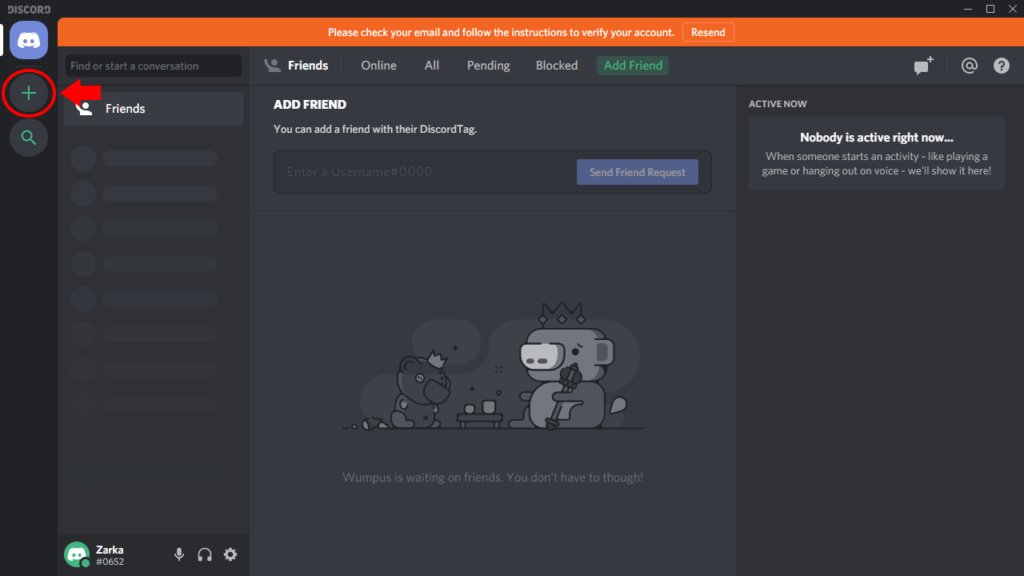
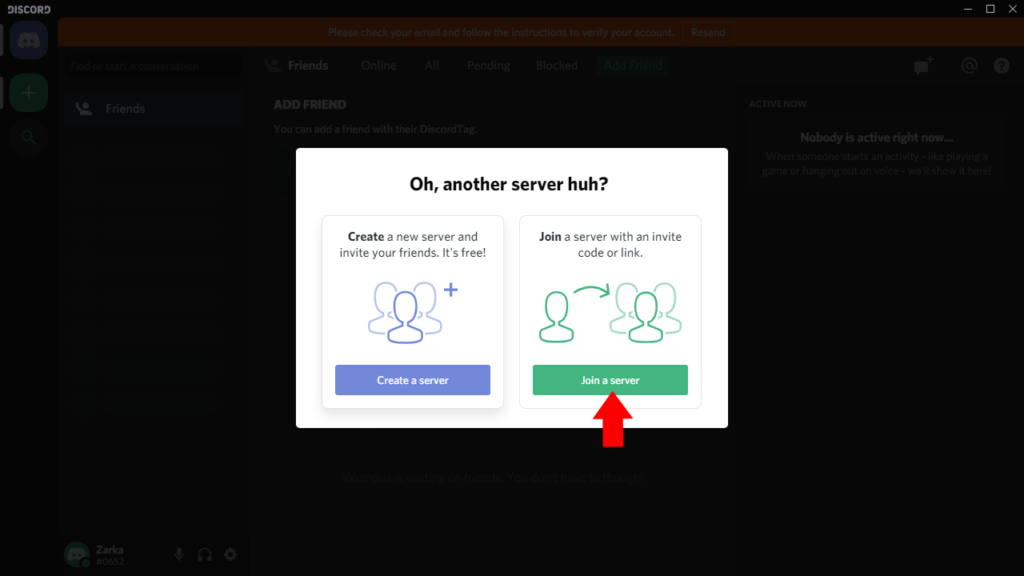
At this point, you will need to copy the link below, then press “Join”, and from here you are ready to start talking with others within the Order of the Rose!
https://discord.com/invite/zdUNY7R
If you have any issues, please let any of the Officers or the sages know and we will do our best to help you! I highly encourage you look through the Advanced Discord Tips and glean some information from there before heading out on your awesome Discordian journey! Otherwise, I have some basic troubleshooting below if you find yourself getting stuck somewhere.
These two areas are the soul reason for making this article, below are some extra information for those who have installed Discord, or are already using it that they may not know exists, or have some issues that happen even when using Discord.
Advanced Discord Tips:
How to join/leave a channel or server’s voice channel
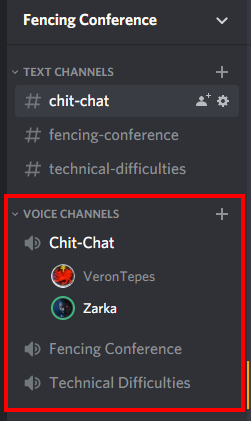
To join a channel, just click on, or select the voice channel you’d like to participate in, it will load you in, and it may take a second or so depending on the speed of your internet and your computer, however you should be able to hear everyone within a few seconds.
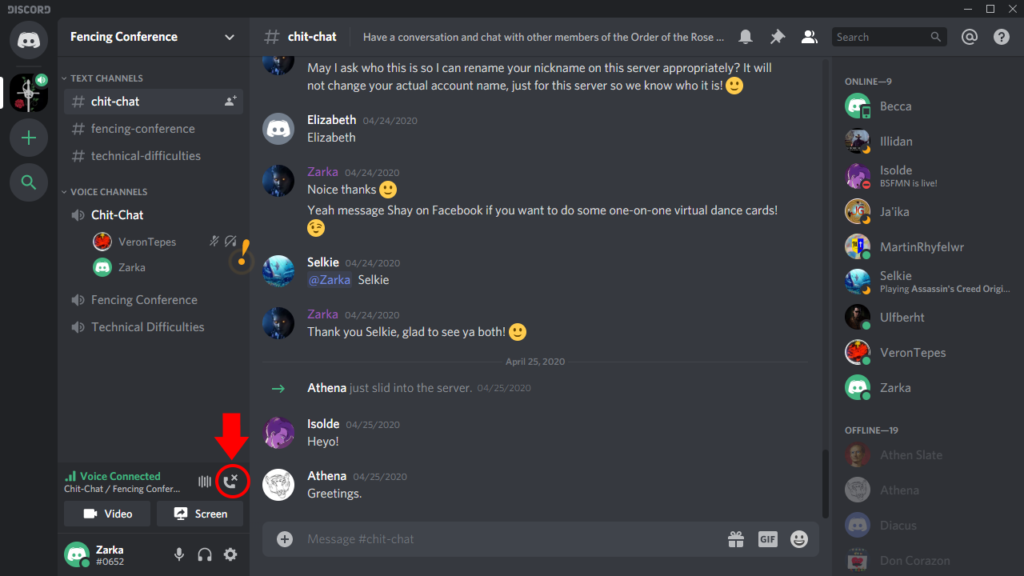
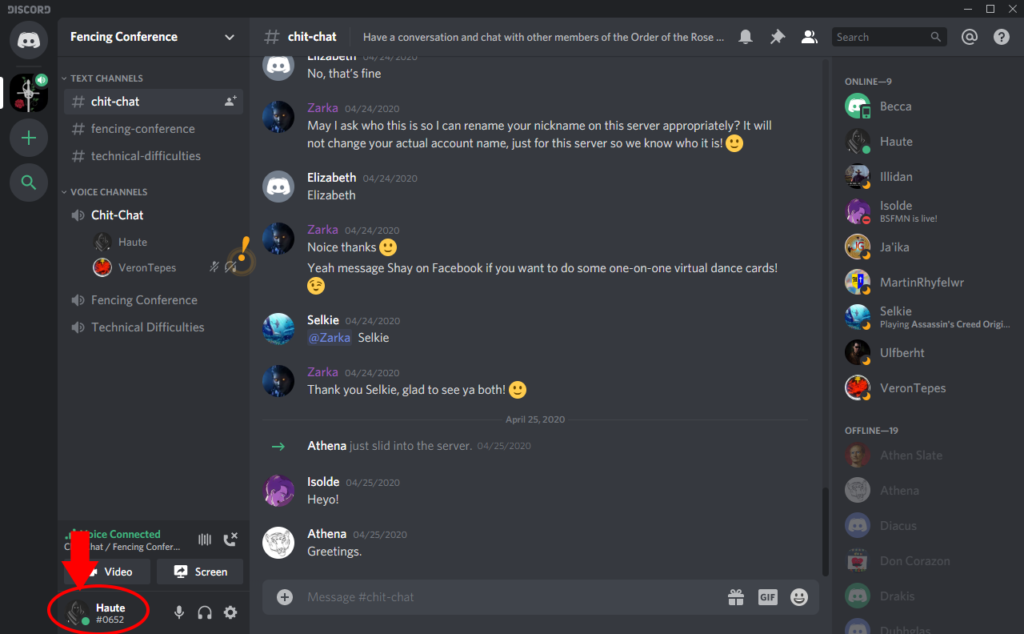
To leave a channel, at the very bottom there is what looks like a phone with an “x”, click on that to leave the voice channel, as indicated in the image below:
How to turn up/down specific people in voice
Sometimes someone may be a bit louder than normal, or a bit quieter. Here is how to change their volumes rather than change all of your already perfect sounding system!

You can even do this when they’re not in the voice-channel, just right click them in the member list of those who’ve joined the server. You won’t be able to test their volume until they join the voice channel, however.
How to change your Name / Picture icon
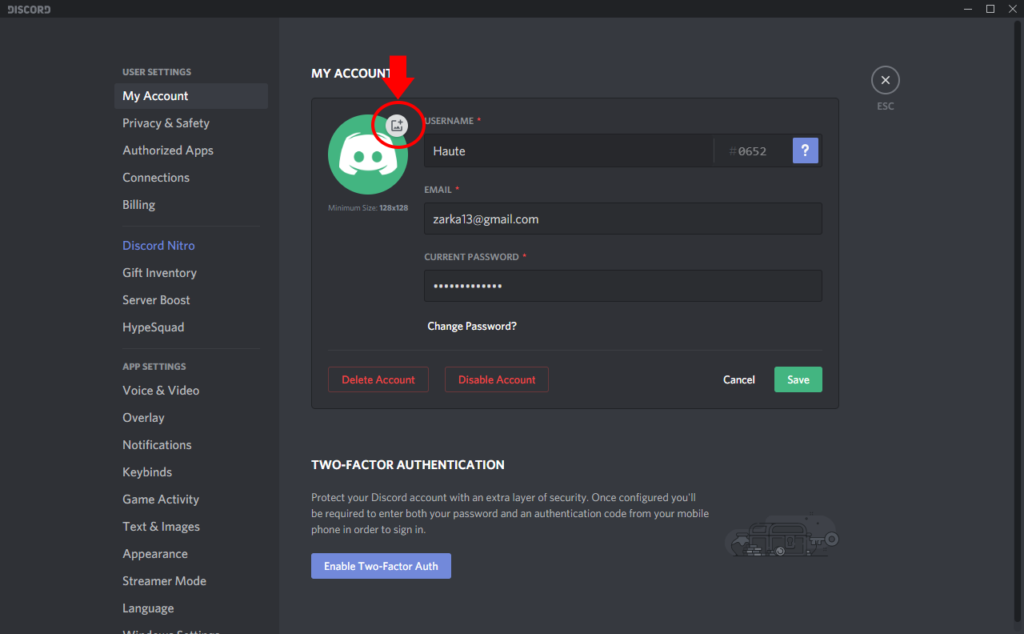
- To change your name, or picture icon, bring up your settings area.
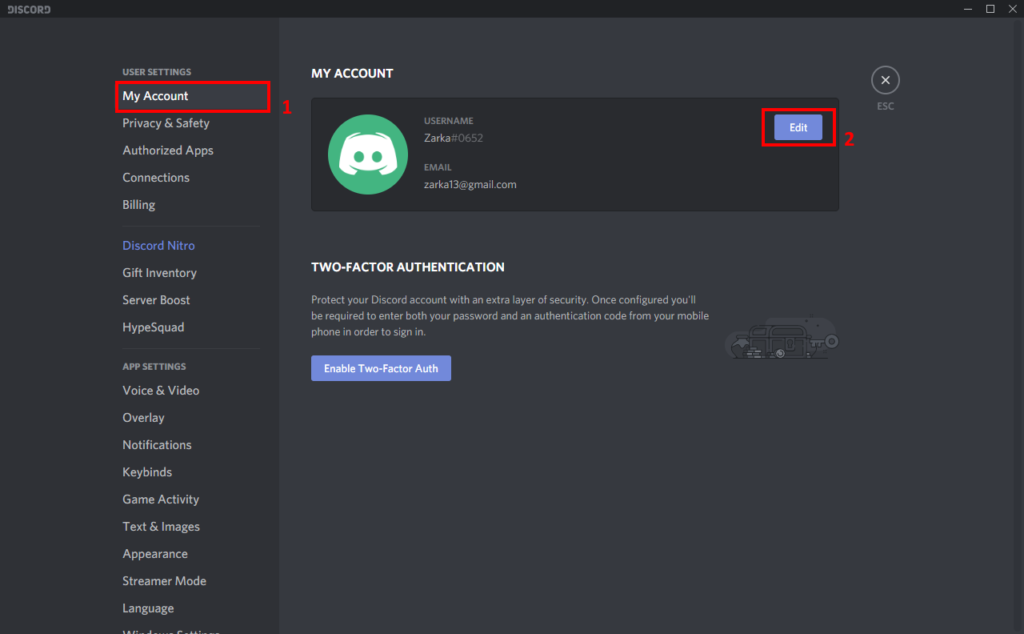
- Here it will ask what to change your name to, and then a password input to ensure safety. Here you can also change what email address, and whether to disable or delete your Discord account.
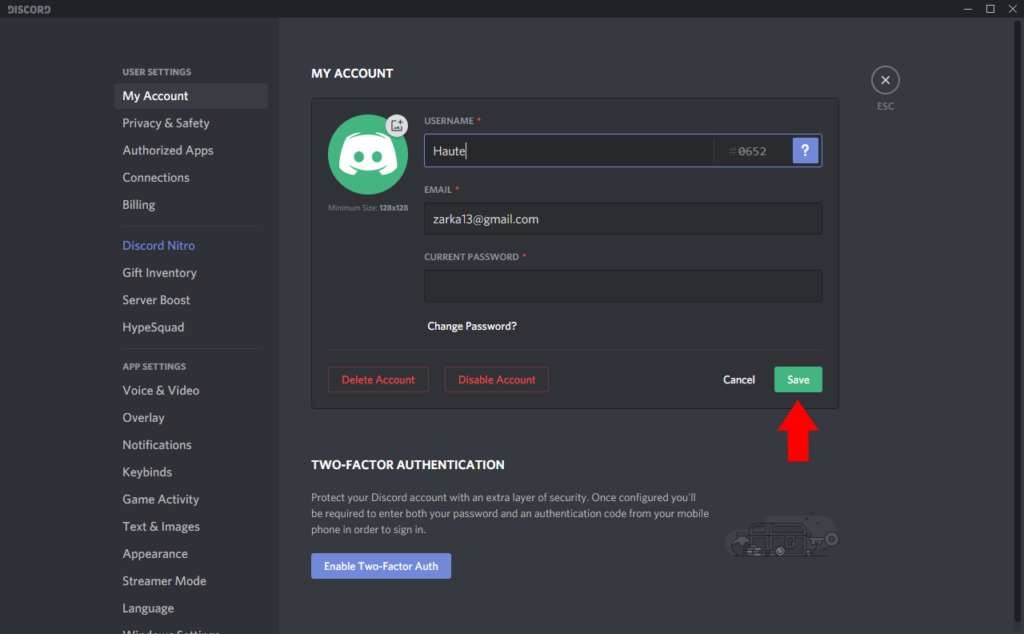
- To change your image, after pressing the “Edit” button, follow along with the image below and select your icon to be recognized by! If your image is too big, it will give you the ability to crop the image as well!
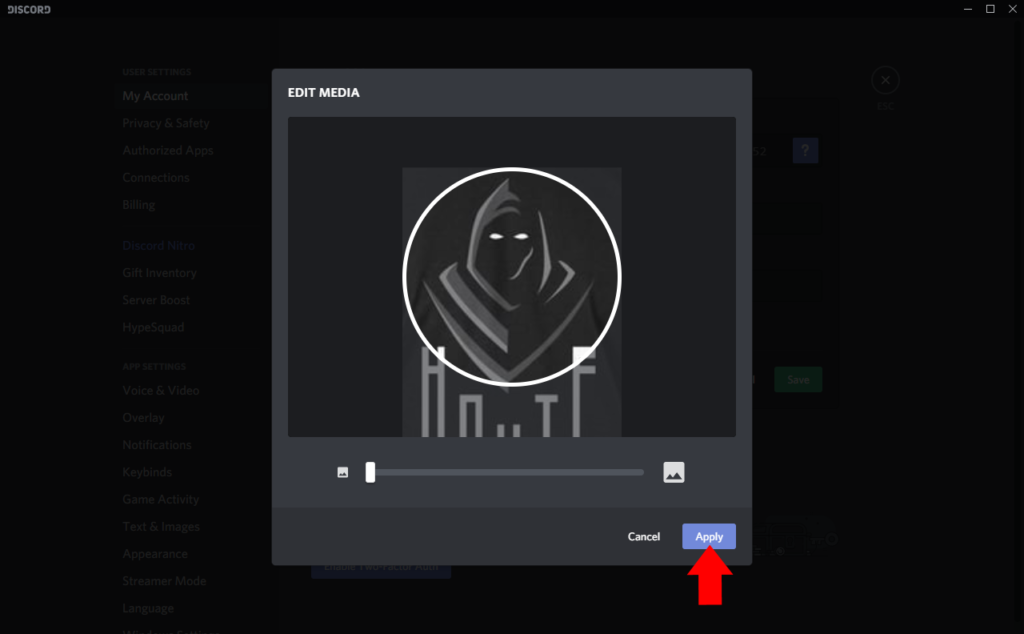
- Once everything is to your liking, type in your password and hit save!
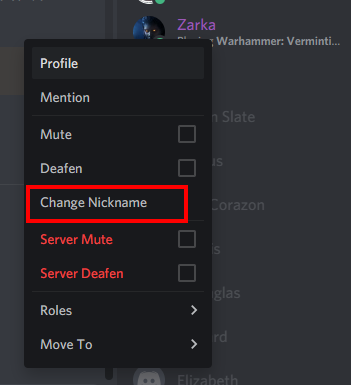
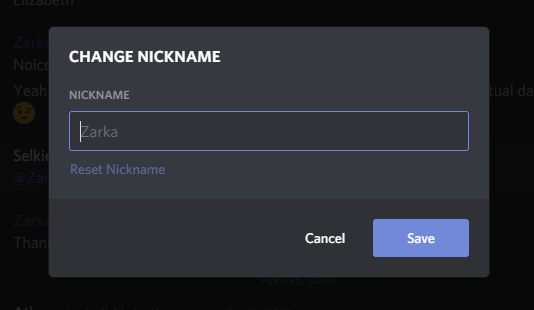
What is a Nickname and how can I change it?
A nickname is something that you want to be known by in a given server but still keep your Discord username the way it was before. This is mostly utilized by DnD servers (and other gaming servers where they would like to see you by your in-game name) Below are the images of how to get to utilize this feature:
What are the differences between Mobile and PC for Discord?
The only difference, really, is the inability to show your camera for Mobile devices onto the server. You can show your camera if you’re in a private group call, however currently Discord has yet to implement the ability for mobile devices to show their cameras on a voice-chat server. I’m sure this will be changing soon!
If you are wanting to use a mobile device rather than your computer (or laptop), you can follow the steps in a similar fashion as detailed above, it will just be installed via the App store, or Google Play store instead of downloading it from a browser. The same steps will apply, and essentially will be the same ideals!
Warning for those using Mobile!
If you are on a voice-channel in Discord while on your phone, you may have some issues if your phone’s screen turns off or is locked in some way. Be sure to re-join the voice channel if your screen fell asleep to fix this issue.
What if I like using “Voice Activated”? What are tips for this area?
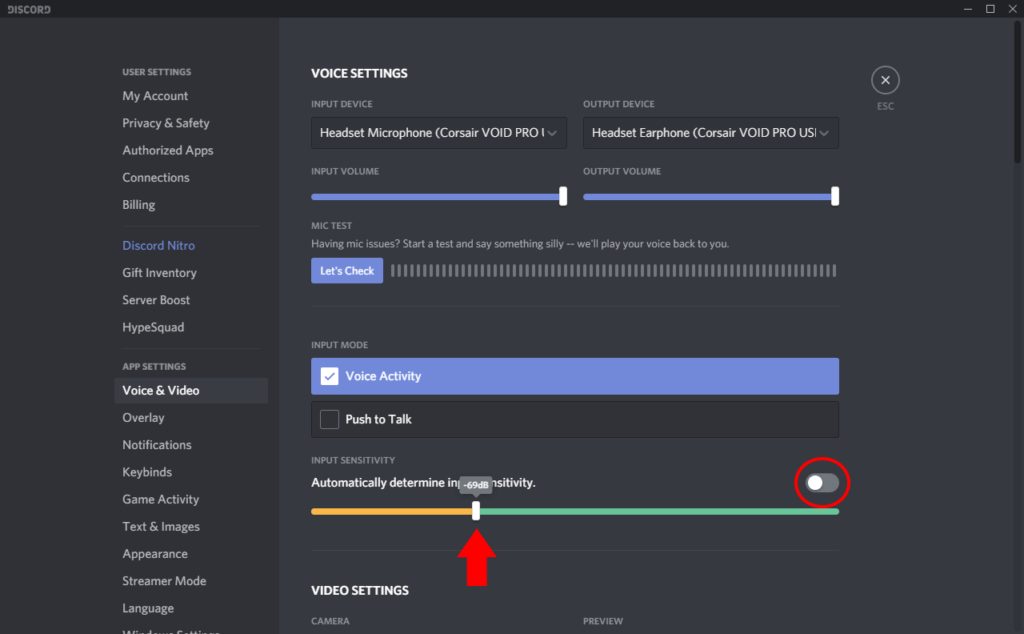
My suggestion in this area is to play around with the “input sensitivity” and make sure the “Automatically determine input sensitivity” is turned off. Below is an example you could try:
Screen-Sharing and Video Cameras
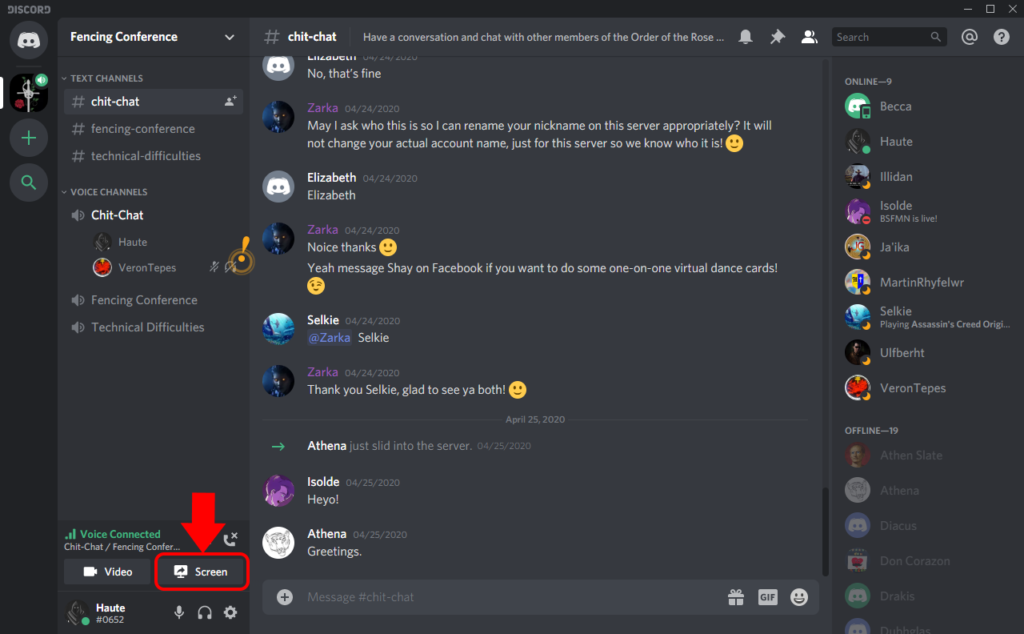
If you would like to share something, there are two ways to do this, but you must be logged in and joined onto the server before these options will appear.
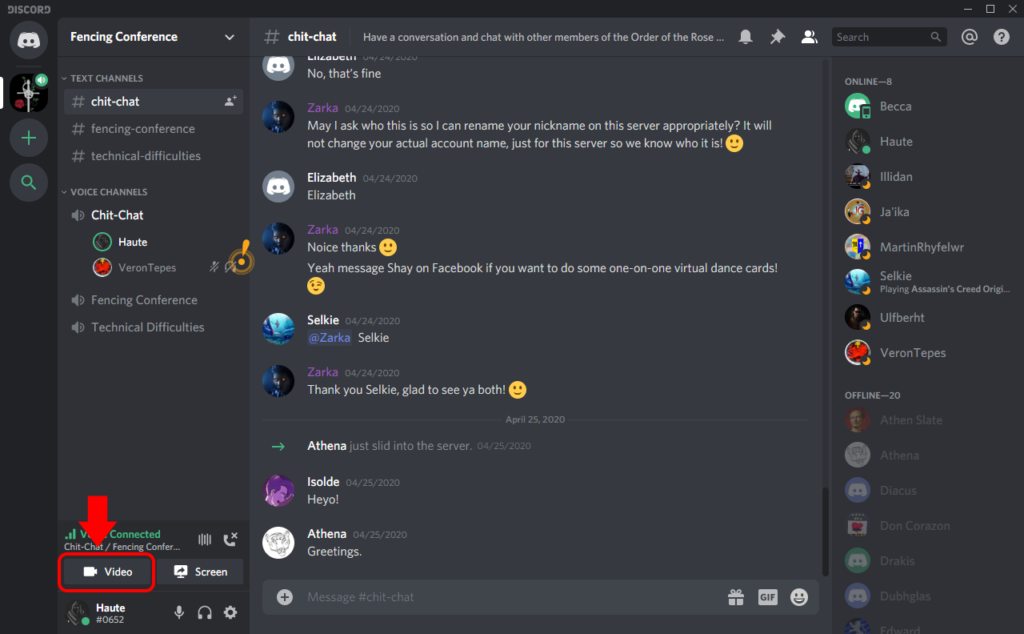
One is the option to share your screen, as detailed in the image below:
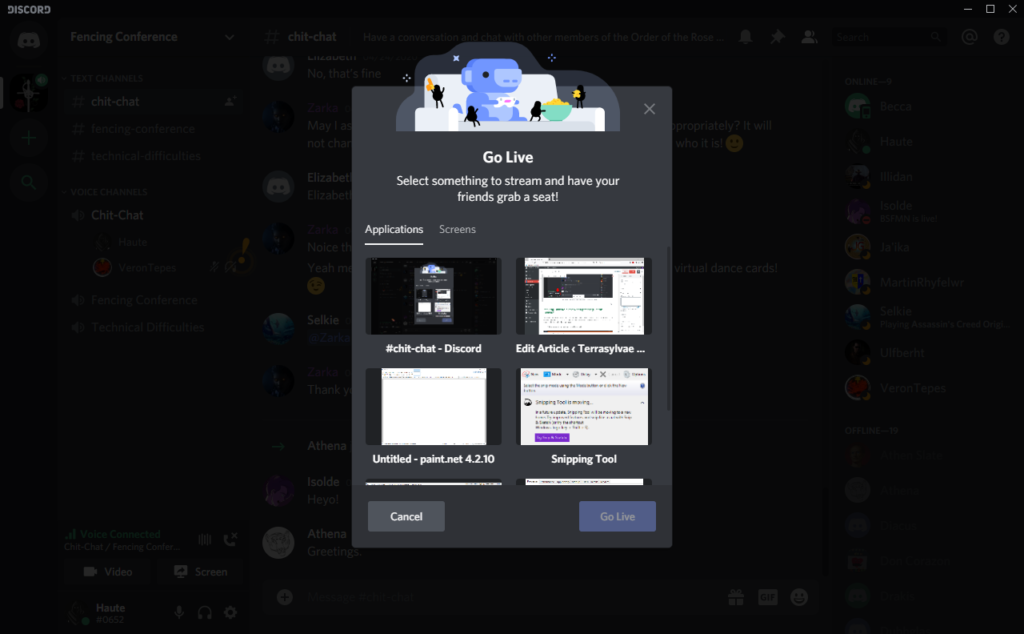
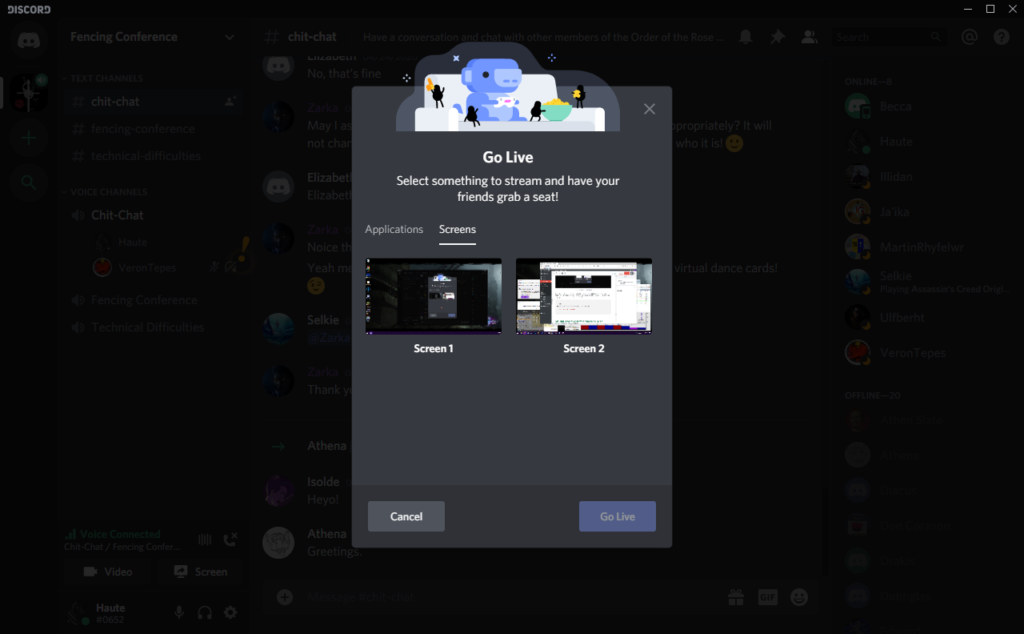
From here, you can select an “Application” which is a specific window to share, or a Screen. I have more than one screen, so it will show based on which screen I would like to share, it may just be for those who only have one screen to share just that entire screen instead of a given window.
If you would like to share your camera, the option to press “Video” is available to you. Remember, this is only available to those using Discord on a computer or laptop, mobile devices can only see this when in a private call group!
Making Discord close when pressing “X” on Discord
For those unaware when you press the “X” at the top right of Discord, it will only minimize it, it will not close the program. This is set as default, I will show you how to change that so it will close when you press that button (rather than minimize)
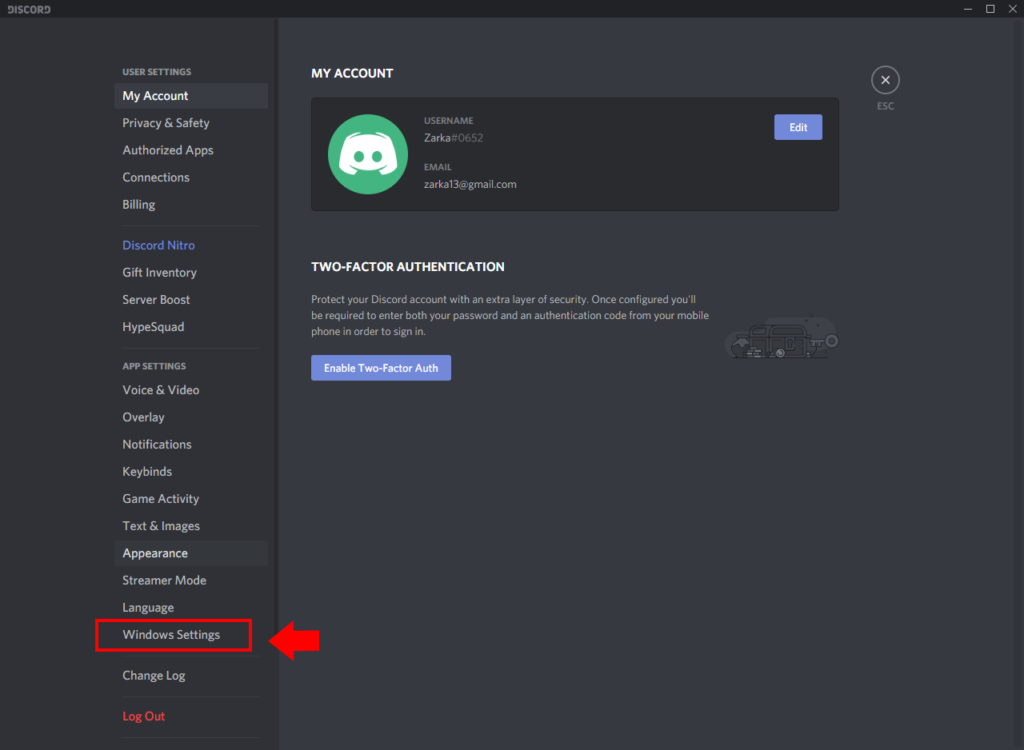
- Bring up your settings section as you did once before:

- From here, navigate to the area as indicated in the image below:
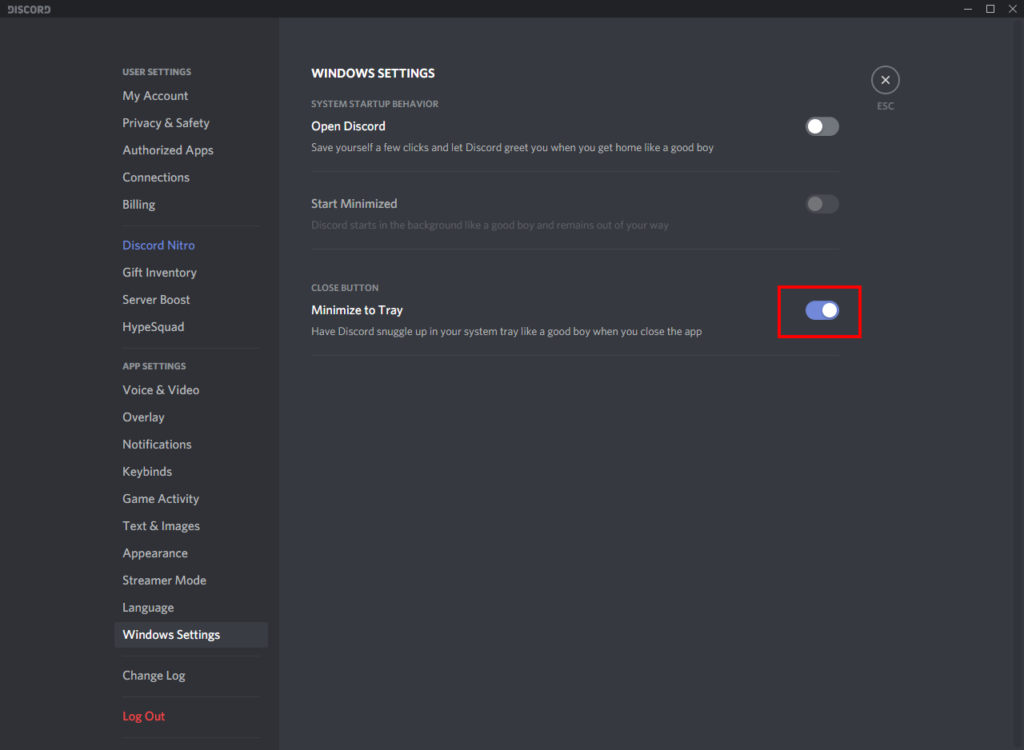
- From here, change the switch that is titled “Minimize to Tray” from on to off (so it’s grey, not a light blue) This will tell Discord that when you click on the “X” at the top right, it will close Discord completely, and not minimize it.
Custom Statuses? What does that mean?
Within Discord, you can change your status to however you want, including having a small message appear next to your name within the member list.
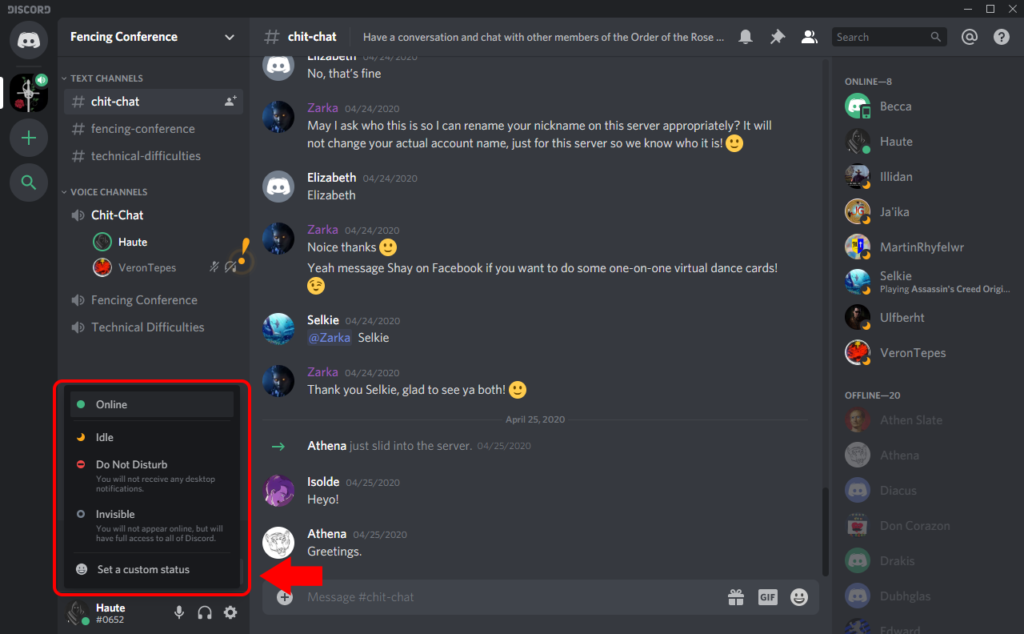
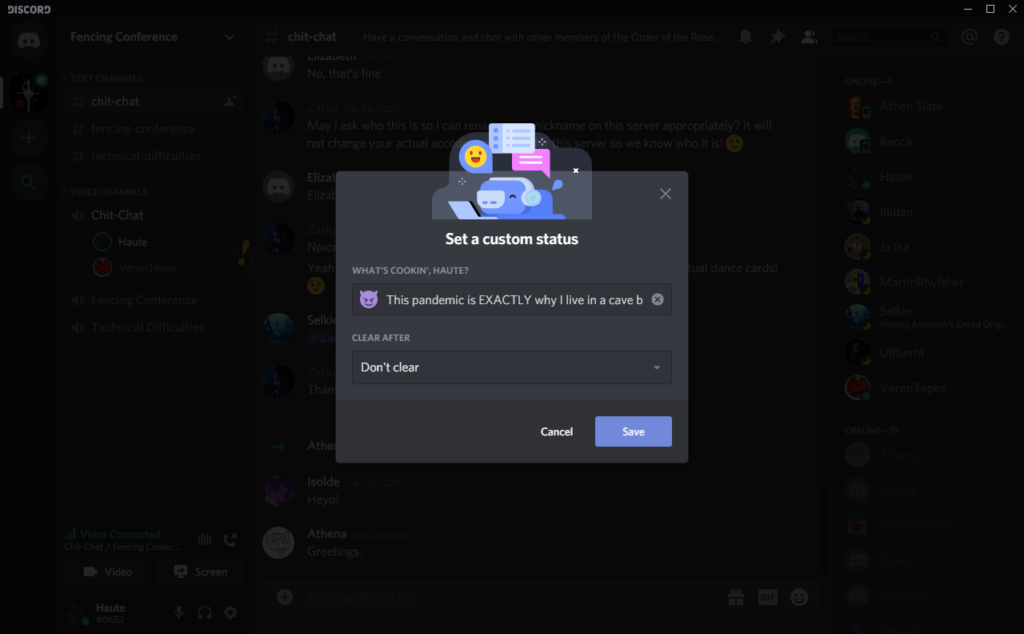
Here you can set your status to away, or invisible! And for the custom status, you can set the clear after time to whichever you’d like! As well as an emote with a quote or saying!
Other Troubleshooting Issues:
My voice volume is still too quiet and people can’t hear me.. (Windows Device)
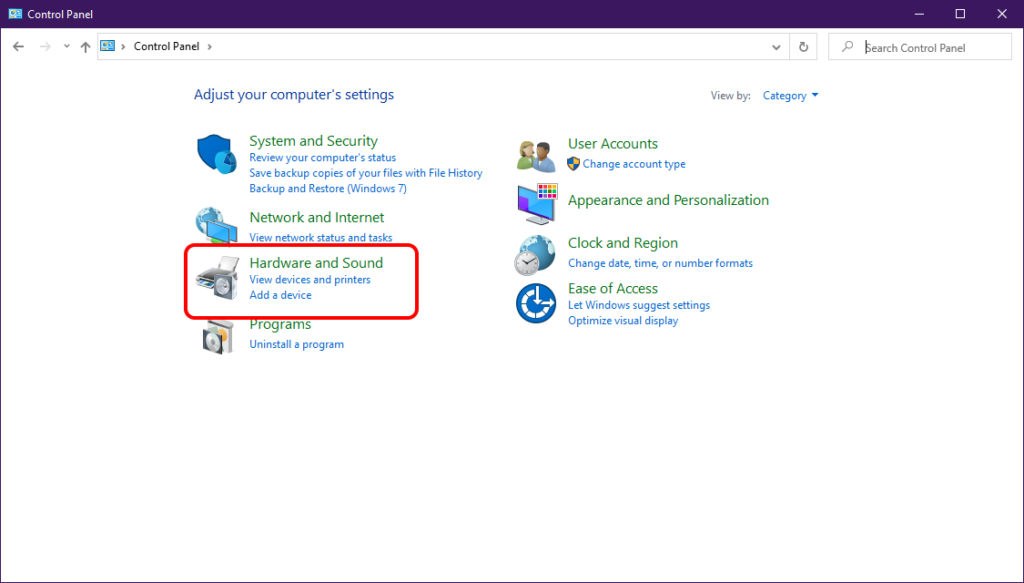
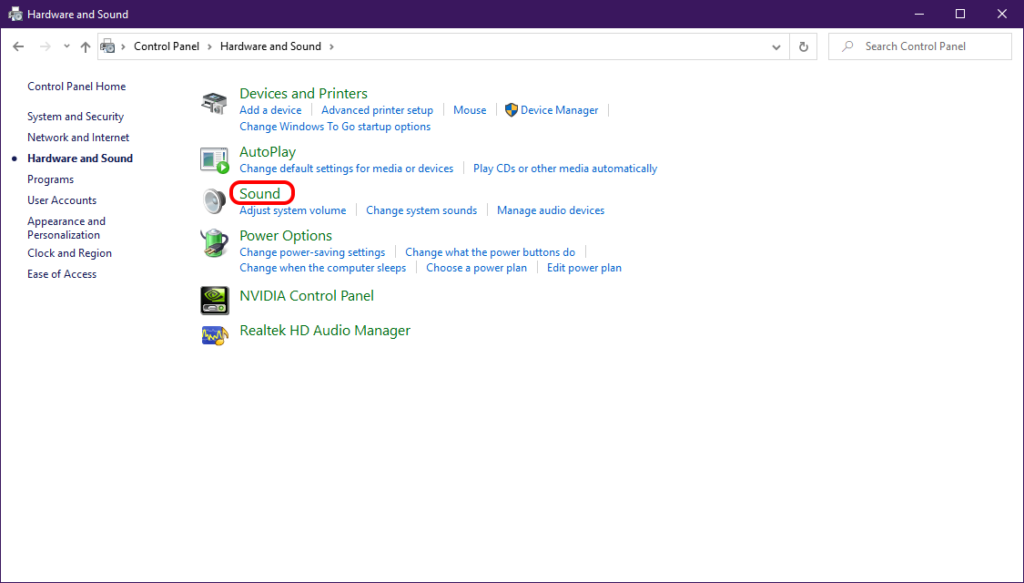
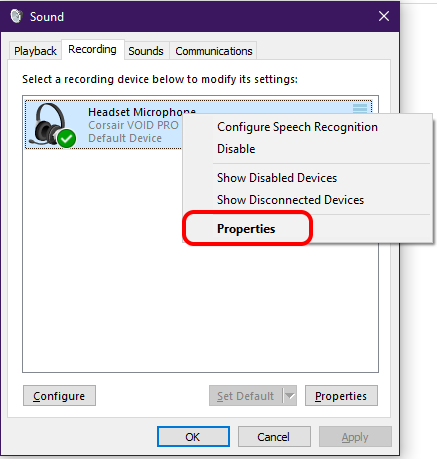
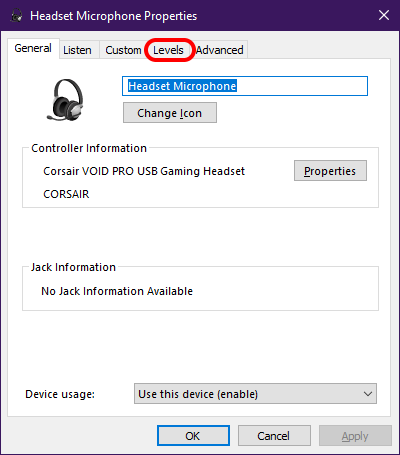
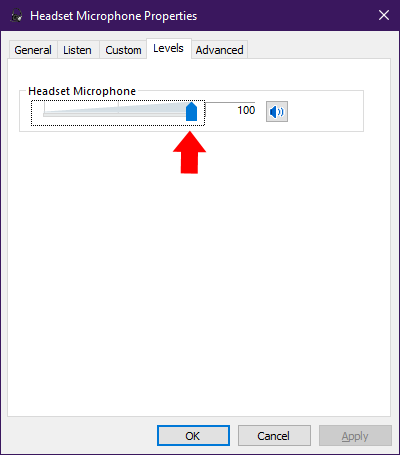
If you’ve turned up your input volume all the way in Discord and people have you also turned up as far as they can, it may be wise to take a look at something in your settings for the microphone. This is a general synopsis of how to turn up the volume of your device with a windows machine and may not apply to everyone, however the general idea is the same:
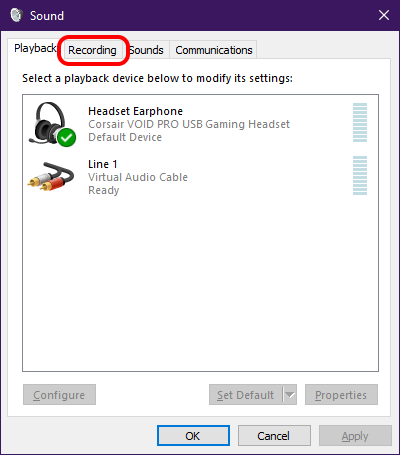
Bring up your control panel as indicated below
If you are still quiet and no one can hear you, you can still type in the text channels! We always get notified when someone enters information within those text channels so don’t worry! If you need additional help, don’t be afraid to ask, we have several tech-savvy people who would gladly give aid!
If you are having issues, and are struggling with anything, please reach out to any of the officers or the sages! We are all able to help as best we can so we can enjoy this tech savvy world together!